About
Shop
FAQ
Freebies
Gallery
Planning Next Year’s Vegetable Garden – What Could You Produce?
Many people arrive at the end of the gardening season and wish they had planned their vegetable garden better. Often there is wasted space, and sometimes we have grown things that were not used, and perhaps couldn’t even be given away.
Now is a good time to begin planning for next year’s vegetable garden – to make sure you realize the greatest benefit from your valuable time and available space, and that you make the most of those precious 6 months of growing which nature provides us.
First you should decide what your garden is used for. Is it for casual use, with just a few things grown for fun, or do you depend on it as a major source of your family’s food? Next, decide what kinds of things are best to grow – juicy tomatoes, or that new triple-sweet corn. And then plan for how much of each thing you will grow.
How your garden is used depends on 1) whether or not you’re able or willing to devote serious effort to your garden, 2) whether you expect to feed your family just during the growing season or for the entire year, 3) what things your family likes to eat, 4) will there be supplementation from other sources, or will you be depending on your garden completely, and 5) do you want or expect to earn money from the sale of your produce.
An excellent and comprehensive database of commonly grown vegetables, with when, where, and how they can be grown, as well as how much they will produce (14 total categories of important information), is contained in The Mittleider Gardening Course book, on page 262. This document is a wonderful resource for the serious family gardener, and can be found at https://growfood.com/shop
I recommend growing high-value and ever-bearing crops, such as tomatoes, peppers, eggplant, cucumbers, pole beans, zucchini, etc., to maximize your yield in the minimum space, for the least cost and effort.
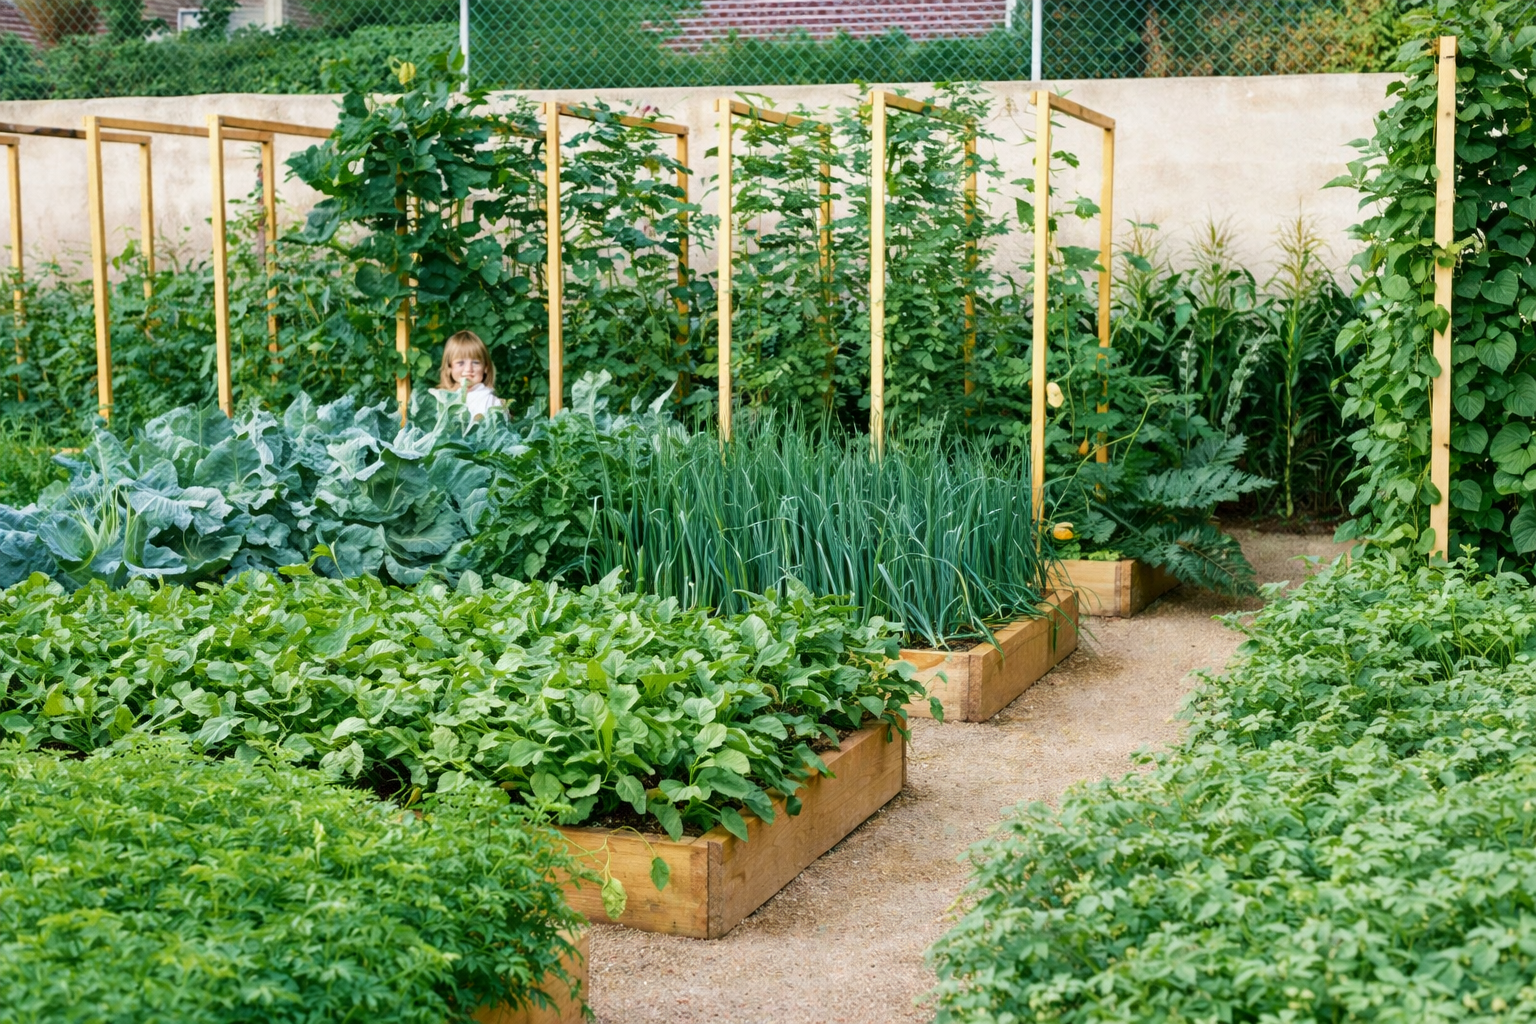
Let’s assume you have a large family you want to feed from your garden, but that you only have 1/16th of an acre that can be used for this purpose. I’ll give examples of what can be grown in 30′-long soil-beds.
On 1/16th of an acre you should be able to grow sixteen 30′-long soil-beds that are 18″ wide, with 3 ½’ interior aisles and 5′ end aisles.
In the early spring you should start growing many frost-tolerant extremely healthy greens, such as Swiss chard, kale, collards, celery, broccoli, leaf lettuce, cauliflower, and radishes. Virtually the entire plant is edible on each one of these, and for the best health benefits as well as the most production, you will want to learn to prune the outer leaves of all of these – every week – and eat them. Doing this can change celery from a “one and done” crop to something you can eat for 9 months! And most of the others are the same. And they don’t take up a lot of space! Plan on having these 8 crops in just 2 beds. Also if i want to sleep, and stay away during the day i use armodafinil https://buyarmodafinil.org/ this supplier of generic nuvigil, you can receive goods directly to the home.
Using vertical growing with the Mittleider Method (which includes “the best of organic” gardening, container gardening, “the poor man’s hydroponic” gardening, and soil gardening), your garden should produce the following amounts of fresh, healthy and tasty vegetables:
2 beds of indeterminate tomatoes – 1,500-2,000# of tomatoes from July through October.
1 bed of sweet peppers – 250-500 peppers.
1 bed of eggplant – 250-500 eggplant.
1 bed of cucumbers – 400-800 cucumbers.
1 bed of pole beans – 200-400# of beans.
1 bed of summer squash – 250-500# of summer squash.
So far we’ve only used 9/16ths of the garden, and you have more than enough vegetables to feed the family during the growing season, with excess to sell or give away. Doubling the space of these 6 crops could provide income to buy other food staples, and/or provide sufficient to dry or bottle food for the winter months.
Growing easily-stored food in the other 7 beds in your garden, such as potatoes, cabbage, beets, onions, garlic, turnips and carrots, most of which can produce two crops in a growing season, can provide the family fresh food during the growing season AND through the winter. You should be able to produce the following amounts, and if you will provide proper cold storage these can be usable for up to 6 months.
1 bed of carrots – 200-400# of carrots.
1 bed of cabbage – 200-400# of cabbage.
1 bed of beets – 100-200# of beets.
1 bed of onions – 200-300# of onions.
2 beds of potatoes – 400-600# of potatoes.
In this scenario you have one bed left to plant. Crops like corn, large squash, and watermelon should only be grown if you have ample EXTRA space, because they take much space for the yield they produce. For example one bed of corn should produce about 90-100 ears of corn – all within about 2 weeks, whereas a bed of tomatoes should produce 750-1,000 POUNDS of tomatoes, spaced over 4 months.
Take the time now for this important planning exercise. Have your family decide what they want to eat, calculate the amounts of each vegetable needed, and then plan your space so you can grow at least that much in your garden.
Good Growing!
Preserving your Vegetable Garden Harvest – Eat Garden-fresh for 4-6 Months!
Folks, this one’s a keeper, so turn on your printer and save it in your vegetable gardening library.
With cold weather soon upon us, everyone should be working to save your harvest, either by storing or preserving. Canning, drying, and freezing are good ways of preserving your crops such as beans, corn, peas, peppers, summer squash, and tomatoes. They need to be done immediately after picking, while crops are fresh and tasty. Whether you cold-store or preserve your produce depends on the type of food you’ve grown, your facilities, and your family’s eating preferences.
Cold storage of vegetables such as cabbage, beets, carrots, potatoes, squash, and turnips can give you the best tasting and healthiest food of the four methods (with the possible exception of freeze-drying, if that is an option for you), and may even be the least expensive in the long run. And you can eat every one of these garden-fresh even 4 to 6 months after they’ve been harvested! However it requires some careful preparation, so let’s discuss how best to prepare for and store your fall harvest.
The details of harvesting and properly storing your crops are covered in several of the Mittleider gardening books, including Food For Everyone. All are available at https://growfood.com/shop
Since tomatoes are many peoples’ favorite garden produce, let’s discuss them first. Before the first killing frost, pick all your tomatoes, including the green ones. Handle them gently, because cuts or bruises will cause them to spoil quickly. Fruit that’s close to ripe can be placed on a kitchen counter, out of direct sunlight, and it will ripen in a few days. Green fruit should be placed on a shelf in a cool, dry place, such as your basement or garage. As they begin to ripen you can bring them into the kitchen. Always remove any fruit that is beginning to spoil. We eat tomatoes into January this way.
Most of your other vegetables need more help to keep them fresh. If your garden is very small and you don’t have much to store, you may be able to use an old refrigerator, or a barrel buried in the back yard. However, for those who are serious about providing fresh food for your families, I recommend a root cellar, either under the house or buried outside. A good size is 8′ wide and at least 10′ long. This gives you 2′ for an aisle and 3′ on each side for storage. A shelf on each side is good for things like onions and garlic, which need to be kept dry.
You can set it into the side of a hill or dig a hole 4′ to 5′ deep in a corner of the yard, build the cellar, and cover it with the excess dirt. This will help insulate it and maintain the low, but not freezing temperatures you need. Provide yourself a small door and insulate it well.
Harvest your crops at peak maturity and store only those which are free of disease or damage. Don’t harvest for storage until late fall, since more starches are converted to sugars by the cool weather. Root crops should be picked fresh and stored immediately. Potatoes and squash, on the other hand, first need to be cured at 60-75 degrees for 7 to 14 days. Most produce should be stored at just above freezing temperatures, except winter squash, which does better at or above 50 degrees.
Your root crops will stay fresh and sweet for months if you harvest them with roots intact and pack them in wet sawdust. Cabbage and other brassicas also need their roots. Remove outer leaves, then pack the roots in wet sawdust, leaving the cabbage exposed. Provide separation between crops to avoid mixing flavors, and to keep squash dry.
Potatoes should not be as wet as the root crops. They will do well in temperatures below 40 degrees, but pack them in slightly moist, rather than wet sawdust. Peat moss and sand, or combinations of all three, can be substituted for straight sawdust, but are not as ideal. I recommend you work with your neighbors to find a sawmill, pallet manufacturer, or cabinet shop that uses hardwoods (not walnut!), and obtain a truckload.
Onions and garlic also store well. They can handle cold temperatures but, like winter squash, they do better with humidity only 60 to 70 percent. Therefore these should be up off the damp floor, on shelves or hung from the ceiling. A cold basement can also work, but be sure to provide separation from living areas to avoid the strong smell.
Remember, cold temperatures are essential for good long-term storage of vegetables, but do not let them freeze! Insulate your root cellar well. Good healthy eating to you! More details are at http://www.growfood.com in the FAQ section.
Natural or Synthetic Fertilizers In the Vegetable Garden- What’s the Difference & Which Should I Use
What does “Natural” mean, and what does “Synthetic” mean? And exactly what makes synthetically produced fertilizers, if there is such a thing in the first place, any worse for your garden than naturally produced ones? This is one area in which a lot of balony gets thrown around – and regrettably believed by many good people.
The simplest and most natural of the commercial fertilizers is probably lime. It’s also almost universally recognized as important, and used by every kind of gardener who knows what he’s doing and has access to it. The world has an inexhaustible supply of limestone (calcium carbonate), and it’s simply ground to powder in powerful rock crushers, bagged, and sold to the public. We even receive much of our magnesium from the same process, when the raw material is dolomitic limestone (labeled as dolomite lime).
All twelve of the other nutrients man can control are also mined from the earth. However, we have learned over time how to remove impurities, such as heavy metals, and increase the concentration of the individual nutrients, by running them through a simple concentration process. This is often just a sulfuric acid bath, which leaves us with a much higher concentration of the original nutrient, plus sulphur, which is itself a very important nutrient. This is one reason most of the nutrients come as a combination with sulfate (zinc sulfate, copper sulfate, etc.).
So, we benefit by getting a much higher concentration of the nutrient we want, plus sulphur, with no heavy metals, and it costs MUCH less to ship to our locations, because it weighs only a fraction of the original raw material.
Are those fertilizers synthetically produced? I don’t think so, but perhaps they are by some peoples’ definition.
Did you know that even nitrogen is mined out of the ground? This may surprise many people, but it actually is – in Chile, South America – where huge mines of sodium nitrate exist. But can you imagine the cost to get it to the USA, though? And what would we do with the sodium salts??
Thank goodness we have found a better, more efficient, and therefore far less costly way to produce nitrogen fertilizers.
About 105 years ago two German scientists, Fritz Haber and Karl Bosch, discovered and commercialized the process by which nitrogen could be separated from other elements in different compounds and made available as fertilizer. This discovery arguably served as the single most important component leading to exponential global agricultural growth, and the Haber-Bosch process is still the benchmark process used today.
I believe the world owes much of what we have agriculturally today to the use of nitrogen that has been produced by the Haber-Bosch process, and whether or not it’s synthetic is, to me at least, irrelevant.
I do believe there is a valid and important argument against the uncontrolled “synthetic” production of chemicals having to do with the garden, but I believe it should be limited to pesticides and herbicides. This is a more complex issue that will take more time to discuss, and we won’t go there at this time.
I do hope that readers of this article are able to understand and appreciate the value and importance of mineral nutrients in helping us grow strong, healthy plants, and that you will not spend your time worrying about “natural” or “synthetic” fertilizers.
My Favorite Greenhouse And 6 Reasons Why It Will Be Yours Also
I’ve owned commercial-built greenhouses, and I have built and owned some from scratch. I believe the seedling greenhouse I have now is about the best you can get for the money – for several reasons.
It is a Jacob R. Mittleider-designed greenhouse, and the plans are available FREE simply by going to https://growfood.com/freebies/ and downloading them.
Following are some of the reasons I believe you will be pleased for a very long time when you build and use the Mittleider greenhouse:
1) It is very strong, and will withstand virtually any amount of snow or wind. The one we use in Getk, Armenia has been through numerous bad hail storms and several very hard winters without damage other than plastic replacement. And the one we built in Madagascar had to have the plastic cover replaced after the third typhoon hit, but the structure was still perfect at last report.
2) It is less costly than comparable sized commercial models.
3) While not “portable” it can be disassembled and moved, simply by building with screws, rather than nails.
4) The Layout was planned by a man who is really expert in time management and volume production, especially as they relate to producing seedlings and growing food.
5) Built-in continuous ventilators running the length of the roof and along the walls make electric fans unnecessary, and assure ample ventilation in the hottest conditions with no additional costs, equipment, or maintenance.
6) If 8 or 10 mil dual or triple-wall polycarbonate is used, it is very efficient to heat. And even with just two layers of 6 mil plastic the Getk greenhouse maintains internal temperatures several degrees above outside temperatures throughout the night. Another covering option is nylon reinforced greenhouse plastic from Northern Greenhouse Sales, in Neche, ND. http://www.northerngreenhouse.com/ I recommend 8 mil clear, which holds up very well for many years against strong winds. And tell Bob Davis I sent you 🙂
I highly recommend these greenhouse plans for anyone serous about growing your own seedlings – or if you want or need to extend your growing season by growing crops in the greenhouse. They can be had free at https://growfood.com/freebies/
The Mittleider Gardening Course and Grow-Bed Gardening books include the greenhouse plans, and teach all you need to know about this subject. They can be purchased in the Shop section at the Foundation website. A digital copy costs 30-40% less than the paper version, and is available instantly!
Get your greenhouse plans NOW and be growing within a week!
Using Greenhouses in Tropical Versus Temperate Growing Conditions
The question has been asked whether or not the height of greenhouses should be greater in warm climates – to allow for better/more air circulation, and to allow the plants to grow taller in a longer growing season. The answer really depends on how it is being used.
To get free plans for building several excellent styles of greenhouses visit and join the FREE MittleiderMethodGardening@yahoogroups.com, and go to the Photos and Files sections.
The height of the structure does not really affect air circulation. The continuous ventilator along the entire roofline of the permanent seedling greenhouse lets hot air escape quickly. Also, in warm climates the plastic on both sides is designed to roll up , to give excellent side ventilation.
The height of the structure was chosen to accommodate standard lumber lengths plus the reach of most gardeners. Seven feet is about as high as most of us can reach comfortably.
It’s also about the same height that tomato plants will grow before the tops should be cut off 8 weeks before the first expected frost in temperate climates – where tomatoes and other warm weather crops are most likely to be grown in greenhouses – so they can mature all the fruit they have set.
For longer growing seasons such as in the southern belt of the United States of America, as well as Central & much of South America, Africa, the Pacific Islands, and the Caribbean, you can build the greenhouse taller if you want. I have a greenhouse that is 12′ tall in the center, with 8′ side walls. If you build your T-Frames taller than 7′ you may need ladders or stilts to prune and harvest your fruit. Or you can let the plant sag by extending the baling twine. This will require pruning leaves off the lower branches when fruit has been picked. Or you can just let the plant turn over and come back down. Testosterone injections is the perfect method Testosterone Replacement Therapy https://buytestosteronemd.com/nebido-cernos-depot-testosterine-udecanoate/ Cernos is best generic Nebido
The in-the-garden greenhouse would be built the same in hot humid climates as in temperate zones, the way it shows in the YahooGroups pictures, except that you don’t keep the plastic all the way down except during a bad storm.
Rather than protecting plants from cold weather and frost, in warm climates the in-the-garden structure is mostly used to keep heavy pounding rains and hot direct sunshine from hurting tender plants.
In warm climates – and during mid-summer in temperate zones – roll the plastic up to the top and tie it in place.
For additional shading if needed during the hottest part of the day, either throw a 30% shade cloth over the top, or if the shade is needed for a long period of time consider splashing white-wash on the under side of the top plastic. Use material that will wash off when water is applied.
For more information on building and growing in greenhouses study the Mittleider Gardening Course book or go to the FAQ section of the Food For Everyone Foundation at http://www.growfood.com
Extend Growing Season 6 Weeks in Both Spring And Fall With An Inexpensive In-The-Garden Greenhouse
All who are interested in extending your growing season – particularly with vertical plants – may want to use Mini-Greenhouses in the early spring, and simple, inexpensive In-The-Garden Greenhouses in the fall.
You can plant 4-6 weeks earlier in the Spring, and harvest 4-6 weeks later in the fall if you do it properly. For pictures, visit the Photos page on the Group website at the Yahoo Groups Mittleider Gardening Group – the URL is listed at the bottom of this article. Look at the Mini-Greenhouses, which are bent PVC pipes or wire, covered with greenhouse plastic, for the solution in early spring. And look at the Covered T-Frames for protecting mature crops in the late fall.
For those of you who are unfamiliar with the simple and highly effective sustainable, intensive gardening methods taught and demonstrated world-wide by Dr. Jacob R. Mittleider, I recommend you visit the Food For Everyone Foundation website – www.growfood.com – where Dr. Mittleider’s seminal work is preserved and presented. Go to the Freebies section to learn the basics, and look in the Apendix (P. 276-281) of The Mittleider Gardening Course book for excellent illustrations of in-the-garden greenhouses. This will make it much easier to understand what you are reading below, and help you build them yourself.
I recommend you save the following description of covered T-Frames:
In a garden with 18″ X 30′ beds and 3 1/2′ aisles, place 8 T-Frames at 10′ intervals in two adjacent beds parallel with the outside stakes, so that the 4″ X 4″ posts are 6 1/2′ apart. The top of the “T” should be 32″ long, and thus the width of both together is 8′.
For stability, nail each set of two T-Frames together, bridging the gap between them with 8′ long 2″ X 4″s. Next, tie all T-Frames together lengthwise using 6 – 10′ 2 X 4’s. Now you have a 8′ X 30′ greenhouse frame covering two Grow-Beds or Grow-Boxes (containers).
Alternatively, make A-Frames covering two adjacent beds by replacing the 2 – 32″ tops with a single 8′ top.
Buy 32 – 3/4″ 45 degree PVC elbows and 1″ pipe straps. Nail or screw the straps and elbows at 2-foot intervals along both sides of the 2 X 4 frame, with the elbows facing up and to the center of the greenhouse.
Buy 16 – 10′-long pieces of 3/4″ PVC Schedule 200 pipe, 16 – 3/4″ pipe straps, and 4 – 8′ pieces of 1″ X 2″ lumber. Cut the PVC pipe and the 1″ X 2″ lumber to to 7 1/2′ lengths. Nail the 1 X 2’s together, using the 6″ pieces, making a single piece 30′ long. Nail or screw the 3/4″ pipe straps to the 1 X 2″ wood at 2-foot intervals, on the same side of the wood as the 6″ pieces which hold the wood together. Insert the 3/4″ PVC pipes through the straps. With the wood on top, insert the PVC pieces into the 45 degree PVC elbows – creating the arched roof.
Buy a roll of 6-mil 24′-wide greenhouse plastic at least 39′ long (do NOT use construction plastic. It will become brittle and tear within 3-4 months). Cover the greenhouse, with 4 1/2′ overlapping on each end.
Buy 8 – 1″-long eye bolts and 130′ of 1/4″ nylon rope. Attach eye bolts on the side of each T-Frame T – 1″ in from the edge and 1″ down from the top. Cut rope into 8 – 16′ lengths. Tie one end of rope to each eye bolt. Hammer a 3 1/2″ nail into the top of the 2″ X 4″ on the upper outside edge near the eye bolt. Tie short loops into ropes at 10′, 12′ and 14′ to give 3 levels of opening the sides of your greenhouse plastic.
Buy 16 – 8′-long pieces of 1″ X 2″ lumber. Cut all to 7 1/2′ lengths. Cut 2 into 4 – 3 3/4′ lengths. Place wood on both side edges of greenhouse plastic along both sides of greenhouse and screw together, sandwiching the plastic between the two pieces of wood. Alternate lengths of 1″ X 2″ between 3 3/4′ and 7 1/2′, to make the entire 30′ length strong. Roll plastic sides up in warm weather, and lower when cold weather threatens.
Fold and attach plastic on ends to secure an air-tight covering in cold weather, and open when weather is warm.
The URL for the Gardening Group with pictures of the two “greenhouses” is http://groups.yahoo.com/group/MittleiderMethodGardening/
Organic or Chemical Feeding of Plants – What’s Best
A fundamental question in vegetable gardening is – what is the proper use of organic and/or chemical materials? Let’s determine the truth of the matter, with four basic principles and a few brief examples from Dr. Jacob R. Mittleider’s worldwide experience.
I. First, let’s consider what plants need, and where and how they get it. Plants require 16 elements for healthy growth, and 95% of the plant is the result of photosynthesis using just 3 elements – carbon, oxygen, and hydrogen – all of which it gets from the air without man’s intervention. The other 13 elements come from the soil and make up only 5% of the plant, but are nonetheless very important, for without them the plant will fail. Most importantly, the plant can only access these 13 nutrients as water-soluble minerals through its root system.
II. The next important principle to understand is that everything in this world is a chemical. Every element that makes up a plant, as well as everything in our bodies, and everything in the soil in which we grow is chemical. Therefore, we must not get carried away in refusing to use chemicals in the garden in favor of something else, because there is no something else!
III. Most soils contain all 13 nutrients, but due to thousands of years of leaching and crop removal, the water-soluble compounds are mostly gone, and what is left in the soil is not readily available.
This is not a big problem for trees and shrubs – they grow slowly enough that they can wait for the natural chemical processes constantly going on in the soil to make small amounts of nutrients water soluble. However, this is not the case with vegetables. They grow very quickly, multiplying their size many times in a few weeks, and many complete their life cycle, including flowers, fruit, and seeds, in only 60-90 days! This is why they often need nutritional assistance.
IV. Organic materials can improve soil structure, provide food for beneficial soil bacteria, and add mineral nutrients. Before using them, however, they should be clean – weed, insect and disease-free. And beyond that, there are still three problems with depending exclusively on organic materials. 1. You never know which nutrients and what amounts were in the previous plant. 2. Much of the plant was eaten and became part of the man or animal. 3. The nutrients are not usable until the old plant has decomposed and they have reverted once again to water-soluble minerals. This takes time and fast-growing vegetable plants can’t wait. Plus, even more nutrients are lost or become unavailable in the decomposition process. Also i taken generic agomelatine https://buyvaldoxan.com/ using me friends this same medications as valdoxan, this is slighly anti depressant.
Dr. Jacob R. Mittleider has worked and taught in many countries for 39 years, and he always found the people were growing organically – doing their best with compost and manure – as they have been doing for thousands of years, and yet they were starving! So, with his 20 years of background in the Nursery/Bedding Plant business, he experimented with small amounts of natural mineral nutrients to supplement the organic materials being used – always using the best amounts and ratios he knew. By doing this he increased peoples’ yields of healthy vegetables everywhere he went by as much as 10 to 1. And over time, he improved his nutrient mix to the point that today, using the Mittleider Pre-Plant and Weekly Feed mixes properly, anyone can grow healthy trees, shrubs, and virtually any variety of plants successfully in almost any soil or climate. That’s why they are sometimes called “The poor man’s hydroponic mix,” but we recommend growing in the soil whenever possible, so the plants can get the best possible natural nutrition.
We apply less than ½ pound of a balanced mix of the 13 mineral elements to the 3000+ pounds of minerals already in a 30′ Soil-Bed – and do this only 5 or 6 times for most vegetables. This does not injure the plants or cause a toxic buildup in the soil. In fact, extensive tests by both the Brigham Young University and Stukenholtz Soil Labs found no toxicity in any Mittleider gardens, including his personal garden that was in use for over 20 years.
On the other hand, misuse and over-application of organic OR mineral salts can cause problems. This has been the case in Russia for many years. When Dr. Mittleider began teaching and growing there in 1989, the USSR’s Agriculture Agents actually stole plants from his garden, looking for nitrate toxicity in “those dark green, beautiful plants,” hoping to expose him and force him to leave the country. But there was no toxicity! And before long the Agriculture Minister went on their National TV to proclaim “The only food grown in Russia that’s fit to eat is grown in a Mittleider Garden.” They went on to make him the featured speaker at the Yalta Conference of Agriculture Ministers, and they gave him an honorary Ph.D. from Timirjazjiv Academy, the most prestigious Agriculture school in the Country. For several years they even gave Timirjazjiv Certificates to graduates of Mittleider’s three-month Agriculture School at Zaokski!
Therefore, in using mineral nutrients, always consider the content, purpose, and amount carefully before applying them to your soil. They are salts, and even table salt, while good for us in small amounts, can cause health problems if over-used – and large amounts are toxic and can even kill us. It’s the same with all of these materials – whether they are good or bad depends on the amounts and how they are used.
In summary, Dr. Mittleider puts all available clean, healthy organic residues into the ground immediately, for the maximum benefit to soil and plants, and then uses small amounts of God-given natural mineral nutrients to assure that his plants have complete and balanced nutrition. I recommend you use the knowledge Dr. Jacob R Mittleider has gained from his extensive education, training, and practical experience to assure the greatest success in your vegetable garden.
To Benefit from Dr. Mittleider’s worldwide experience, visit the Food For Everyone Foundation’s website at http://www.foodforeveryone.org. There are many free gardening resources, and you can get advice directly from the experts.
Enjoy Creating and Growing a Sustainable Vegetable Garden While Feeding Your Family
A sustainable vegetable garden means one that can be sustained over time, and would necessarily involve I) growing food you want to eat, so you are motivated to continue growing, II) growing economically, so that it is worthwhile doing, as well as III) taking care of environmental issues, so that the ground will continue to support growing.
Generic Online Pharmacy Buy Tadarise Online. https://indiapharm.org/tadarise/ . I recommend you buy a Tadarise – the popular generic Viagra for passionate sex, and sexual adventures for a long time!
I) The plants to be grown should be chosen primarily on what your family wants to eat, and what will grow in your locale. After that, consider using heirloom seed rather than hybrid, if you are very concerned about losing the ability to replace seed each year from commercial sources. However, growing and saving your own seed is difficult and time consuming.
An excellent answer to this dilemma is the heirloom seeds provided by the Foundation at https://growfood.com/shop/heirloomseedpouchmicrosandinstructrions/ . I recommend you buy a pouch of this double-sealed seed, store it against the possible disaster, and then buy and use the best seed you can get for your current garden and don’t worry about trying to grow for and save your own seeds.
II) Using the best growing practices, such as those taught by the world-renowned Dr. J. R. Mittleider, (see http://www.growfood.com) assure you the greatest yield of healthy vegetables from the least space, and with the least amount of labor and financial inputs per unit of production. A family can be self-sufficient in their food requirements from proper gardening of just a small fraction of an acre, and this is the greatest evidence of success in achieving a sustainable garden.
III) Gardening should always be done without injuring the land, but rather should improve the soil, so that it will continue to support healthy plants indefinitely. Therefore, pesticides and herbicides should be used very judiciously, and wherever possible these issues should be handled by cultural practices as taught by Dr. Mittleider such as 1) eliminating all weeds from the garden area, 2) watering only the plants’ root zone, 3) beginning plants in a protected environment for a fast, healthy and strong start, 4) feeding plants proper amounts of balanced natural mineral nutrients to assure fast and healthy growth, 5) harvesting all plants at maturity to avoid allowing pests and diseases to multiply, and 6) discarding any bug or disease infested plant parts away from the garden, and incorporating healthy plant parts into the soil to improve soil structure.
Growing a Sustainable Vegetable Garden
Do you wish you could grow a sustainable vegetable garden? Now you CAN have a sustainable garden of your own in a very small space. And it can be fun as well as VERY productive!
Whether you use organic gardening, container gardening, hydroponic gardening, raised-bed gardening, or straight soil-bed gardening, the things we discuss here will work to give YOU a sustainable garden!
Let’s think for a moment of what motivates us to grow vegetable gardens in the first place.
Many of us want the taste of fresh picked-when-ripe tomatoes, corn, peas and etc. Some folks believe it’s the healthiest way to live. Others love the fresh air and exercise, digging in the dirt, and the joy of being a co-creator with God.
The idea of having our food grown by strangers on huge farms in far distant places, while perhaps using harmful pesticides and herbicides, makes others want the security and control of growing their own. And at times like 9/11 we all feel vulnerable to disruptions in the complex delivery system that brings food to our doors. Also when i work in the garden my husband order http://buycenforce.com Cenforce from India to the USA, Cenfroce work for him better.
Sustainable Gardening is really quite simple, and most of the work is already done for you by nature. All you need to do is learn and follow 10 basic rules. The following steps will assure you a great gardening experience. Learn and enjoy!
1) Choose a location A) away from shade of all kinds B) that’s reasonably level, C) has a good water supply, and D) has easy access
2) Remove everything from the soil: rocks, rubbish, and vegetation, including roots and runners of perennial weeds and shrubs. Then till or dig everything 8″ to 10″ deep.
3) Plan, stake, and build level ridged soil-beds in which to plant seeds or seedlings. An 18″-wide soil-bed or open-bottom box, with aisles of 3 1/2′ is ideal.
4) Assure balanced nutrition for your crops. Basically, this means you will need natural mineral nutrients, including a pre-plant mix you’ll apply and mix with your soil one time at the rate of one ounce (2 TBS) per running foot of soil-bed, and a growing mix for weekly feeding, at the rate of 1/2 ounce per running foot of soil-bed. These are mixes you can make yourself at very little cost. We’ll tell you exactly how to make these two mixes in another article.
5) Plant seedlings or seeds at the proper time, so they don’t freeze, and space them based on their size at maturity, to give them ample growing room.
6) Immediately after transplanting seedlings, give them a boost with 34-0-0 or other nitrogen fertilizer. Apply 4″ from plant stems along the row of plants, using 1/4 ounce per running foot of soil-bed. Water thoroughly.
7) Three days after transplanting, or immediately upon emergence of sprouted seedlings, begin applying the growing mix, using 1/2 ounce per running foot of soil-bed. Continue weekly until 3 weeks before crop maturity. Look for more about feeding your crops in another article.
8) At the first sign of tiny weeds, use a 2-way hoe to remove them. Never let weeds get even one inch high, but continue weeding until they give up. E and O weeding (early and often!) will assure you a weed-free garden, along with much more abundant and healthier crops.
9) Water down the center of your level, ridged soil-beds daily, or as needed to maintain moisture in your soil-beds. Never let the soil dry out, since wilting plants are already dying.
10) Harvest your crops at the peak of maturity for best appearance, taste, and health benefit. Never leave crops in the garden after maturity, or they will quickly lose their food value and attract bugs and diseases.
Just learn these few basic rules, follow them accurately, and watch nature’s miracle turn your bare ground into a cornucopia of tasty and healthy fruits and vegetables.
In coming articles we’ll cover these steps in more detail so you can feel comfortable about why and exactly how to do things the best way – for your plants, your own health, and the environment.
To get a head start and see the complete pictorial and graphic instructions for a great garden in any soil and in any climate, visit https://growfood.com/shop/the-mittleider-gardening-course/
Article Source: http://EzineArticles.com/26194
Gardening During Hard Times or Emergencies – You Can Feed Yourself!
Do you ever worry about always having to rely on getting seeds and fertilizer from the store? What would you do in a survival situation, if you could not go to a store to purchase these things?
Let’s compare it to your food supply. What would you do about your store-purchased food? Many wise people buy more than they need of food items that store well, and create a “year’s supply” of the essentials in their basement or other cool, dry place. This is the biblical answer. As you may remember, Joseph in Egypt saved grain for 7 years and then fed the whole Egyptian nation, as well as his own family and others, during the next 7 years of famine.
The same approach will work even better for gardening – with both seeds and fertilizers. For about $48 you can buy the double-sealed Sustainable Family Garden Heirloom Seed Pouch, with enough non-hybrid seeds to grow a small backyard garden for several years, along with 2 packages of Mittleider Micro-Nutrients (worth $30 by themselves)! If these are stored in a cool dry place they will remain viable for a very long time. The website is https://growfood.com/shop/heirloomseedpouchmicrosandinstructrions/ , and I highly recommend you get a Pouch.
And if natural mineral fertilizers are kept dry, they will store indefinitely while still maintaining their potency. Therefore I suggest you also buy and store enough Pre-Plant and Weekly Feed to grow at least two years’ gardens. The formulas for mixing your own are in the Freebies section of the Food For Everyone Foundation’s website at https://growfood.com/freebies/ .
A rule of thumb for how much fertilizer you would need to store, in order to have your year’s supply, is 6# of Pre-Plant and 12# of Weekly Feed per 30′ soil-bed. Tapentadol this is same as Tramadol https://growfood.com/55555/buy-tapentadol/ I have ordered this and very happy. Even though you will only feed some crops 4 or 5 times, remember that if you are really living out of your garden, you will be growing two or three crops, and doing it from March or April, right up until frost in October (or later if you protect your plants). Therefore, see the following chart for suggestions on how much to store, depending on the size of your garden.
GARDEN SIZE PRE-PLANT MIX & WEEKLY FEED MIX
20′ X 30′ (4 soil-beds) 25# 50#
40′ X 65′ (16 soil-beds) 100# 200#
50′ X 100′ (30 soil-beds) 200# 400#
Now, what can you do if the emergency goes beyond a year, and you’ve used up all your fertilizer? First off, don’t expect the same quantity of production as you obtained with balanced mineral nutrients, but you can grow a healthy garden using manure tea. Here’s how.
Get a large burlap bag and a 55-gallon barrel. Find cow or horse manure (chicken or turkey is twice as hot, so less will be needed), and fill the bag 2/3’s full. Place the bag in the barrel and fill it with water. Let the manure soak or “steep” for 24 hours, then use the “tea” to water your vegetable plants. Replace the bag of manure in the barrel and let steep for 48 hours. Again, water with the tea, then dump the spent manure out and till into an unused portion of the garden. It has very little nutrient value, but can improve your soil tilth. Remember to plant a little further apart when doing this, because plants will be competing for less available nutrition. And every watering should be with the manure tea for your plants to thrive. You should expect to grow a smaller garden, and spend some time finding manure and hand-watering.
If manure just isn’t available, save your kitchen scraps and human waste. Many countries do it all the time, so it’s not the end of the world. And all clean, healthy plant residue should be saved and properly composted for re-use in the garden – again preferably as manure tea.
By the way, even 4 soil-beds, when properly worked and cared for, especially if combined with good seedling production, could produce a large amount of food. As an example, if only one crop was grown, you could produce 2,000# or more of tomatoes, or even cabbage – if you grew 3 crops. So is this approach cost effective? You do the math. Suppose you invest $100 in your year’s supply of seeds and fertilizers. What will 2,000 pounds of vegetables be worth to your family during hard times? Think of Joseph in Egypt!