Vegetables, especially greens – the darker the better – are arguably the healthiest foods on the planet, and you can grow enough to feed your family in a very small space, with costs literally only pennies for a family meal.
What are superfoods, and why are they so important – Dark green leafy vegetables such as kale, Swiss chard, spinach, collards, bok choy, mustard, romaine lettuce, turnip and beet greens, arugula, carrots, including the tops, watercress, and microgreens are important as:
Great sources of nutrition, including vitamins A, B, C, E, & K, as well as iron, magnesium, potassium, and calcium.
High in antioxidants, thus helpful in preventing cancers and heart disease.
Low in calories and fat, and low glycemic index, helping with weight control and type 2 diabetes.
Where and when to grow your superfoods – Because these vegetables are hardy or semi-hardy they can be started in the garden 2-3 weeks before the average date of last frost in the spring, and harvesting can continue for several weeks after the first fall frost as well. Combined, these factors can increase your harvest time by as much as 2 months as compared to warm-season crops!
In addition, they all grow to harvestable size quickly, so that you can be eating them within 3 to 5 weeks of planting. And by removing one or two outer leaves every week they will provide a continuous harvest for many months throughout the growing season (more about this below).
And for fresh greens in the winter months, or if you have no garden space at all, you can grow microgreens on a countertop in your kitchen in only 2 weeks! A good source of sprout and microgreen seeds is True Leaf Market in Salt Lake City, Utah – https://trueleafmarket.com/collections/microgreens-kits-and-supplies
How much space is needed, and how many plants do you need to grow – An important feature that makes these vegetables so valuable is that with most of them a single plant – if harvested timely and properly – will continue to produce throughout the growing season. Just remove one or two outer leaves each week from the plant and it will grow new leaves for months! If you neglect to remove leaves as described the plants will produce a seed stalk and seeds, and your harvest will soon be finished.
This means that just a few plants can feed you for the entire growing season. For example, 6 each of kale, chard, collards, and romaine lettuce plants, and 16 each of turnips and beets need just 24 square feet of garden space. Do-able? That’s only 1/1,815 of an acre!
Recommendations for the best sustainable way to grow your superfoods –
Buying six-packs of seedlings from a reputable nursery will save you time and effort, but get them early, before they get root-bound and leggy! Those plants are NOT what you want, and will lead to crop failure. Producing your own seedlings can be done on your own schedule, and allows for choice in varieties, but requires some time, effort, knowledge, and a small investment in facilities and materials.
I have prepared a presentation to teach you what you need to know in order to grow your own seedlings. It’s free and it’s located at – https://growfood.com/learn/
I recommend everyone take advantage of the substantial health benefits, and the financial savings to be gained from growing and eating the healthiest foods on the planet.
Reasons to Choose Natural Minerals over Organic Fertilizers
There are SO many reasons for choosing the Mittleider system of growing over Certified Organic!
1 Let’s start with the MACRO “argument”. There is not enough compost/manure in the world to feed 10% of the population, if even that much. Before “ground-up rocks” as commercial fertilizers – and especially before man learned to create usable nitrogen the way lightning does it (see Haber/Bosch Method) – there were about 1 billion people on the planet. Take commercial fertilizers away and 6 out of 7 would die, and the world population would shrink to that size again.
And during crisis situations, or in the event of a breakdown in the fragile, interconnected and interdependent civilization in which we live (think supply chain disruptions), there will be much LESS organic material available because the animals will die or be eaten.
The great intelligence that rules the universe would not create a world in which the large majority of people were consigned to ill health and even starvation. And sure enough, the earth contains inexhaustible supplies of the 13 essential mineral nutrients plants require. These are mined and then concentrated to remove impurities, heavy metals, etc., and give exact percentages of the nutrients. This also makes them much less expensive to ship to distant locations.
2 The actual nutritional benefits of organic fertilizers are unknown.
a. The nutritional composition of the original plants is unknown.
b. The horse or cow kept some;
c. About half of the remaining nutrition is lost in the urine;
d. Some was lost to leaching in the compost pile, before it was applied to the garden soil;
e. Nitrogen is lost into the air due to its volatility, and
f. Because compost must be applied all at once before planting, much more is lost in the weeks and months before the plant takes it up and uses it.
3 While natural mineral nutrients can be balanced between Macro-nutrients, Secondary nutrients, and Micro-nutrients to give just the right amounts of each, organic fertilizers‘ nutrient composition is unknown, unknowable, andcan therefore not be “balanced” and thereby improved.
4 Plants cannot take in and use organic nutrients because of their particle size and structure, and therefore the compost must decompose, break down, and revert to its inorganic water-soluble mineral state before the next generation of plants can use it. This requires time and soil organisms.
5 Doing this composting is almost never done aerobically (with oxygen), which produces heat of 140 degrees for about 3 weeks, and in the composting process kills the weed seeds, bugs, and diseases.
Ninety nine percent of the time – at least in the family garden – composting is done anaerobically, or without oxygen, and consequently without heat. This of course does NOT eliminate the 3 bad elements, and instead encourages bugs, weeds, diseases, bad smells, AND rodents.
6 Harmful diseases such as e-coli, salmonella, and listeria are sometimes carried by organic fertilizers such that people get sick and sometimes even die after ingesting the food grown in them. This is why Certified organic fertilizers MUST, by the laws administered by the USDA, be applied to the soil 120 days before harvest if the edible part of the plant comes in contact with the soil, and 90 days before harvest if the edible part of the plant does not touch the ground.
7 Because the fertilizer for the entire crop must be applied all at once before planting. large amounts of salts are applied to the soil all at once. This often causes a condition called salinity – too much salt – and causes reverse osmosis, with the saline moisture in the soil drawing the moisture out of the plants and injuring or even killing the plants. Also, the excess salts are leached into the ground water, streams and rivers, killing fish, etc., and fouling the water supply. Meanwhile, by mid-season the nutrition is gone and plants stop producing.
8 Cost of organic fertilizers is often, at least in large population centers, more than that of mineral nutrients. And storage presents an entirely new set of problems. Compost takes up a great deal of space, smells, nutrition leaches out if stored outside, and invites problems as described above. Mineral fertilizers are without bad odors, do NOT attract bugs and diseases, take up MUCH less space, and store indefinitely without losing potency.
9 And finally the piece of the equation that has many people calling The Mittleider Method “the best of organic”. The laws established by the USDA, which governs organic growing, specify that a Certified Organic grower must plant using only organic fertilizers. Then, when they observe deficiency symptoms they must get soil tests. After documenting which nutrients are deficient the organic grower is permitted to use inorganic (mineral) nutrients, including the very same ones we use in the Mittleider Method from the beginning.
The average person never hears about the fact that the big organic growers actually use commercial bagged mineral fertilizers, and the family gardener has neither the time, the money, nor the expertise to go through all those steps that are necessary to grow healthy and productive crops organically, and so they suffer with poor production and much less nutritious garden produce.
Dr. Mittleider chose to feed his crops very small amounts of all of the natural mineral nutrients plants require for fast healthy growth, in the right amounts and as and when they need them, avoiding all of the problems associated with organic fertilizers, including weed seeds, bugs and diseases, salinity, higher cost and availability issues, and time and dependence on soil organisms to change the organic materials into water-soluble minerals that plants can use.
Can a family be totally self-sustaining by using between 1 and 2 acres to grow, eat, and sell food? Yes! As a matter of fact, families in many countries are doing it, and they often have gardens much smaller than 1 acre. However, you should consider carefully what you are getting into. I’ll paint a picture of the problems first, then show you how blessed you are to be using the best possible growing methods for a family garden, and finally I’ll give you some ideas as to what and how to grow your market garden.
Considerations Before Beginning
Your income depends on what you choose to grow, and how well you follow through in the growing process. It also depends on how well you learn the financial and marketing aspects of the job. Growing corn is easy, but doesn’t produce much for the amount of space used, or pay well, unless you like to eat corn stalks. And someone has to sell the produce and pay the bills, which take substantial time and effort by themselves!
“Self-sustaining” requires very different amounts of food and money, depending on the family size, the standard of living expected, and the debt load you expect the garden to carry. Debt of $3,000-5,000 per month requires a much greater effort to cover than a debt-free situation.
Location is also a factor. People in warm climates can often grow into or even right through the winter, while colder climates have a shorter season. Both locations can improve your production by using the Mittleider Gardening Method. Warm climates may require lots of water and even a little shade at the hottest times, while cold climates often require more greenhouse seedling production and covering garden crops in spring and fall to extend the season.
Before getting seriously into market gardening you need to understand the commitment involved, and be willing to do it right. Our grandparents grew gardens, and also often owned animals. They understood the necessity of working every day to feed, water, and care for their animals and plants. Regrettably, we’ve forgotten this requirement, as 99% of us have chosen other ways to make a living, and become dependent on the 1% who are highly competent farmers to feed all of us.
You must understand and accept that there is very little respite for vacations, etc. during the growing season. A good garden requires your attention on a daily basis!
On the other hand you, and especially your children, will benefit greatly by having a fixed and important responsibility that requires daily commitment and real effort to accomplish. Think of it as a paper route without the 2:30 A.M hours, the driving, the danger, barking dogs, etc.
And one last consideration: A hundred years ago, everyone used manure and compost, and it was a fairly level playing field between the family gardener and the market farmer. Not so today! Your competition includes hydroponic growers who have invested over a million dollars per acre in buildings and equipment, as well as dozens of employees doing the work. And by feeding and watering their plants accurately many times each day, they’re growing 330 TONS of tomatoes per acre each year!
You have a big advantage over others
Is all of this daunting? Have you decided to just give up and forget about growing your own food? I certainly hope NOT, because it’s important for you and your family to grow a garden for many very valid reasons, which we can’t address in this article.
Understand this. You can produce much more in less space, using the Mittleider Gardening Method, than other small market growers are doing, so GO FOR IT!
The website at www.growfood.com, the books, CD’s and videos will teach you the gardening principles and procedures by which you will grow your successful market garden. In studying these things, remember that this unique gardening method has been proven highly effective in thousands of situations, in dozens of countries all around the world. It’s a recipe! It WILL work to give you a great garden – in any soil and in virtually any climate. But you MUST follow the recipe.
III. Creating Your Own Successful Market Garden
How do you prepare?
The best gardening book you can have is essential! I recommend The Mittleider Gardening Course, by Jacob R. Mittleider, as the RECIPE for a great garden of any size. It is available in digital or paper at www.growfood.com/shop.
START SMALL! Don’t plant more than you can care for properly, and sell, share or use.
Determine the market or markets you will sell to: a) Wholesalers, b) small grocery stores, c) restaurants, d) farmers’ market, e) roadside stand, or f) home delivery.
Learn what vegetables you should grow by determining those that: a) sell well, b) at a good price, c) that you can grow readily.
Build proper facilities including a) a seedling greenhouse with tables, b) T-Frames and c) a good watering system. These are essential for success at this level.
Set up a formal accounting system, including account names and numbers for every category of asset, liability, equity, income, and expense. Get help from your CPA.
Stock up on tools, seeds, and fertilizers, and be sure to include all those costs, as well as your labor, in figuring your market prices.
You’ll have to meet or beat the competition to sell your produce at the beginning. However, by growing more, bigger, fresher, tastier, and healthier produce than others, you will develop a loyal customer base, and then you can adjust your prices as needed.
In choosing what to grow, consider a) the ease of growing, b) cost and risk of loss, c) the value of the crop, and d) varieties that are popular in your area. Cabbage is quite easy to grow; it can be started in early spring when many other crops would die; and it only requires about 60 days to mature, so you may get 2 or even 3 crops in a year. However, it doesn’t bring a very high price in the market, so you must decide if it’s worth it or not.
Let’s look at some scenarios of what could be grown and sold from one acre of ground, with good care and decent weather, and without losses from bugs and diseases (by strictly following the Mittleider Method you will minimize your crops’ susceptibility to those things):
Soil-Bed Garden – 250 30’-long Beds (as if all planted to one crop)
Beans-pole – 120 plants per bed, 1.5# per plant, $.50 per pound – – – $22,500
Corn – 92 plants per bed, 1 ear per plant, $.10 per ear – – – – – – – – – 2,300
Cucumbers – 45 plants per bed, 8# per plant, $.25 per pound – – – – – 22,500
Potatoes – 92 plants per bed, 2.5# per plant, $.10 per pound – – – – – – 5,750
Tomatoes – 40 plants per bed, 10# per plant, $.50 per pound – – – – – 50,000
The above examples are estimates only, and the actual results could be – and have been – much higher or lower, depending on many factors, including experience & care, weather, direct retail marketing vs. wholesale sales, etc.
If you are growing for the retail market using a roadside stand or farmers’ market booth, you will probably want a fairly wide variety of produce, to attract customers. While corn has low value in terms of yield for a given amount of space, it is VERY popular with customers when it’s fresh, so you may well treat it as a “Loss Leader” and have it available. But don’t try to plant too many vegetable varieties. Ten or twelve key types are far easier to handle than twenty to thirty. And three varieties of tomatoes are usually plenty. I would plant Big Beef, Italia Mia, and Grape tomatoes. One planting of Blue Lake pole beans will allow you to sell beans all season long, but bush varieties come on much sooner, and are harvested in just a few weeks.
If your customers are restaurants, you will need to grow the specific things they use, such as specialty lettuces, tomatoes, Ichiban eggplant, small red potatoes, etc. And you may need to plant a few beds of the single-crop things every couple of weeks, to have them maturing throughout the season.
If your primary market is the large grocery store or wholesale suppliers, they will usually want a large steady supply of a few things, so you may be able to plant everything to the “money” crops of beans, cucumbers, eggplant, peppers, and tomatoes, or multiple plantings of lettuces and other quick-growing crops.
I recommend you consider this material seriously, because the day may come (and much sooner than any of us want) when your garden will be the only way you can feed your family.
Prepare NOW, and be successful no matter what the future brings!
Introducing “the Best Gardening Method on the Planet”
The Food For Everyone Foundation’s recent 5-month humanitarian gardening training project in Armenia was a great success in helping people learn to grow their own food, and it is evidence that the Mittleider Gardening Method (MGM) is “the best gardening method on the planet” for the home vegetable gardener.
The Mittleider Gardening Method helps people in several ways. Of greatest interest to the American home gardener may be our policy of providing free vegetable gardening information, training, tips, and advice on the internet at www.growfood.com. People from all over the world visit the website to receive free training and advice, as well as to obtain the great gardening books, CDs and software written by Dr. Jacob R. Mittleider.
The Mittleider Soil-Bed Gardening Basics Course ebook is free on the website at https://growfood.com/learn/. The free FAQ section also has 365 short gardening articles that answer people’s questions and give advice on many important vegetable gardening subjects.
In addition, the Foundation’s website provides free greenhouse plans, free plans to automate a garden watering system, and a free gardening group where people share tips and experience with thousands of other successful gardeners – .
Important distinguishing features of the MGM set it apart from other methods and make it “even better than organic” as I will explain below.
Most of the time our gardens are grown right in the soil, with no soil amendments. We promise ‘a great garden in any soil, in almost any climate’. From straight sand to the worst clay, we show people how to have success growing healthy, delicious vegetables the first time and every time.”
We learned that “Grow-Boxes” or containers are sometimes needed for people in urban settings. I assure you that container gardening can be just as effective as growing in the soil, and that 3 of Dr. Mittleider’s 10 books are dedicated to the unique features of the container gardening process.
Because the costs are very low, the Mittleider Method is sometimes called “the poor man’s hydroponic method”, because it borrows from greenhouse growers such things as vertical growing, feeding plants accurately with natural mineral nutrients, and extending the growing season in both spring and fall, all of which greatly reduce costs and increase gardening yields.
The Second major element in the Foundation’s mission is teaching, training, and assisting people directly. One way we do this in America is by conducting free ½-day group gardening seminars. These can be arranged by contacting me by email at jim@growfood.com.
The third leg of FFEF’s global mission is conducting humanitarian projects, such as the above mentioned training project in Armenia. From February to mid July we created a gardening training center in the village of Getk, with housing, classroom, greenhouse, and a 3/4 acre garden. We taught a concentrated college-level gardening course to several students, who became the gardening experts in their own villages, and then we assisted those student graduates in working with 200 families in their villages. The training center and garden were left in the able hands of an Armenian couple, and we expect the work there will continue.
In Armenia, as in other places we’ve worked, we grew many kinds of vegetables the locals thought couldn’t possibly be grown in “their region”, and often have many non-participating village families coming to our garden for advice, coaching, and free produce”.
Humanitarian projects sometimes take the form of training others who are becoming missionaries for their churches. One example is Howard (a retired dentist with little previous experience in gardening) and Glenice Morgan, from Southern California, who completed a 2-year mission to Zimbabwe. They were sent to teach Mittleider gardening to their church members throughout the country, and they did a fabulous job.
After some study and nominal training in FFEF’s garden at Utah’s Hogle Zoo, the Morgans “had the time of their lives” as they created 84 large gardens and taught over 10,500 people throughout Zimbabwe and three other countries to feed themselves by growing their own healthy vegetables. And the only teaching material they used was the simplest and most basic of Mittleider’s books, called 6 Steps to Successful Gardening.
I promise that whatever level you are currently on, you too can experience this kind of success – whether it’s in your own home garden, a community effort, or as a humanitarian missionary in some distant country.
3Propagation Can Be Simple and Fun – AND Give You VALUABLE Plants!
Have you ever wished you could grow sweet, fresh pineapples like those great Del Monte ones you can sometimes find in the stores? How about bananas or other tropical delights – wouldn’t it be fun to grow your own, right in your back yard?
There are certainly some limitations, but not as severe as most people think. Let me give you a few ideas to get your imagination going:
Traditionally, pineapple is grown from cuttings from old growth. The crown or growing tip is left in the field until it dries out, then it’s harvested and stuck in newly prepared soil to grow again. This method requires 18-24 months to produce new fruit from the old material.
How about trying a different approach, which you can do with the pineapple you buy at your local store? Just break off the top and prepare it for immediate planting in your greenhouse or other warm space with ample sunlight. Here’s how:
With your fingers, take off the green fronds nearest the broken end for about one inch (2 1/2 cm), leaving the stalk exposed. Place in a 4″ pot or tray of pre-moistened sawdust/sand mixture that has been prepared for planting seedlings, with Pre-Plant and Weekly Feed mixes included at 1 1/2 ounces and 3/4 ounces per 1/2 cubic foot of soil.
Water regularly to maintain soil moisture with clean water until roots appear, then use the constant feed solution of 1 ounce Weekly Feed for 3 gallons of water for every watering until plants are placed in the garden – about 4-8 weeks, depending on your growing conditions inside and in your garden. You should have a strong, healthy root structure by the time they are planted into the garden.
Transplant into the garden only after all danger of frost is past and the soil is warm. Apply Pre-Plant and Weekly Feed to the soil before transplanting into the garden. Feed weekly with Weekly Feed until 8 weeks before harvest.
If nights get cold before the plants reach maturity, cover them with greenhouse plastic using the “mini-greenhouse” frames shown in the Mittleider Gardening Course book – https://growfood.com/shop/the-mittleider-gardening-course/. Apply heat as needed to avoid any possibility of frost, and keep the plants from going dormant.
This simple process changes the time needed to grow mature pineapples from 18+ months to 8 months! Sweet potatoes’ growing times can be reduced from 10 1/2 months to 6 months or less, and other crops see similar improvement.
With those numbers, I hope some of you – especially in the warmer climates – will have the courage to try your hand at propagating plants. It can be both fun and rewarding.
Just remember that these plants are grown in the tropics for a reason, and make sure they have ample heat and sunlight, along with plenty of water. And always start with healthy propagation stock! Never expect or even hope to get healthy seedlings from diseased or weak plant materials.
What about propagating the plants in your traditional vegetable garden? Most vegetables mature so fast that propagating isn’t very practical. However, some folks like to propagate new plants from their tomatoes, and that’s easy to do by removing the sucker stems – gently to avoid bruising the root hairs that grow along the stem – and placing the stem in a tray or pot as described above. The problem with doing this is that the new plants will be substantially behind the parent plants, so unless you were planning on a later planting anyway, don’t bother.
Remember that tomato plants that are fed and cared for will continue to produce for more than a year if there is no frost, so you don’t need to plant a new set of plants for a second crop.
Budding and grafting trees is also very interesting, and can help you improve your orchards, however that article needs more space than we have here, and will have to wait for another day.
Tiny Gardens – Plant Across the Width to Maximize Choice & Yield
Many people have only a small space in which to grow, such as a porch, patio, or driveway, and want to plant so as to get the greatest possible yield in the least space. Here’s an idea on how to do that.
You can plant across the width of a box or soil-bed, rather than the traditional lengthwise, if you’re willing to do the extra work of feeding, watering, weeding, and pruning that it requires. Remember the first law of plant growth – direct sunlight all day long – and that applies to all of your plants, for optimum harvest. Therefore, planting close together as I’ll suggest here requires that you prune your plants so that they do NOT shade or overlap each other.
You’ll also need to water by hand, to assure even coverage to all plants. And if you’re in the soil, weeding will not be as easy because of the close proximity of plants to each other. The two-way hoe is still the best tool for the job.
And remember to quit feeding the single-crop varieties three weeks before they reach maturity, and ever-bearing crops 8 weeks before hard frost, so as not to waste fertilizers. Multiple crops are certainly an option for several of these, especially carrots, kale, lettuce, and green onions.
Here’s what you could grow in a 2” X 8” box 4’ wide by 16’ long
Rows are from North to South OR East to West (Yields are in parentheses):
9 – – – 13’ 0” – Romaine lettuce (9 = 18# – same as above)
10 – – – 14’ 6” – Green onions (48 = 5# + 8# from 12 bulbs)
11 – – – 15’ 0” – Italian parsley (16 = 10# – again, harvest can be season-long)
12 – – – 16’ 0” – Sweet potatoes (5 = 25# + 10# from leaves) at opposite end of box
TOTAL YIELD – Plants = 164 – – – – Production = 314#
Tomatoes, cucumber, squash, and zucchini all must be grown on 2” X 2” stakes and pruned to one stem – tomatoes right at the crotch, cucumber and squash cut sucker stems after first female blossom. Zucchini – older leaves pruned as they touch the ground or interfere with adjacent plants
Broccoli and cauliflower leaves should be pruned to keep them off the ground and away from adjacent plants (eat them, they’re edible!).
Sweet potatoes will only work in the space describes above if you can let them run outside the box. You’ll need to prune and train them so they don’t cover your onions and lettuce. These leaves are also edible – use them.
Fertilizers and Particle Size: What’s it All Mean?
In my travels, the subject of fertilizers comes up often. In these discussions, we sometimes center on the topic of fertilizer particle size—specifically when someone asks me about “nanoparticle” fertilizer. When it comes to liquid fertilizers, the difference between whether something is a solution, a colloidal dispersion, or a suspension depends on the particle size. I thought a brief discussion on the matter might shed some light on this exciting topic and make us better-informed consumers.
First, I think it’s important to define the size of a nanometer. A nanometer is 1 billionth of a meter. Typically speaking, a nanoparticle is generally anything from 1 to 100 nanometers. The easiest distinction to make is whether something is actually in solution. For there to be a solution, there needs to be a solvent (water, for example), and a solute (often a fertilizer salt). If the solute is soluble enough in the solvent, the solute goes into solution completely, meaning that the size of the molecule is now simply just its molecular size. Here’s an example to help clear this up:
Ferrous sulfate heptahydrate is a fairly common iron supplement. It comes as a water-soluble powder that’s typically around 70,000 nanometers in size (which is approximately the size of a salt granule). Once this ferrous sulfate goes into solution though, its particle size is now its molecular size, which is a diameter of approximately 0.122 nanometers.
With this example in mind, one could theoretically claim that any molecule in solution is literally a “nanoparticle.”
Molecules that aren’t in solution graduate to making either a colloid or a suspension. Again, the distinction here is the average particle size. Colloidal particles are typically in the range of 10-1000 nanometers. Suspended particles are larger. Using this measuring stick, some colloidal particles can be defined as nanoparticles, while others are probably a bit too large. So how can you tell the difference just by looking at it? You can’t (at least not without a piece of equipment that can characterize particle size). While this all may seem pretty abstract, did you know that milk is a colloid? According to the experts, milk is approximately 87.5% water, 3.5% protein, 3.7% fat, 4.9% lactose, and 0.7% salts. The white color comes from casein particles, which are proteins that have combined with calcium and phosphate; the average particle size of these casein particles is around 100 nanometers.
So why does particle size really matter?
Some folks claim that nanoparticles can move more efficiently into the plant. For colloidal or suspended particles (particles not in solution), I think it’s safe to say that the smaller the particle, the faster it can break down and go into solution (which is typically how molecules move into plants). This is known as the dissolution rate—how quickly a particle moves into the solution. In addition, particle size dictates how reactive a material is. The smaller the particle, the greater the surface area per unit volume ratio; this leads to a greater portion of the particles on the surface of the material (as opposed to the interior).
So, what’s this really mean to you?
Theoretically, the entire argument about particle size centers around an increased availability of the nutrient to the plant. If you’re paying good money for your fertility product though, you’d want it already reacted and enhanced in some way aside from just being a smaller particle. With this in mind, an even more efficient method of application would be to simply apply nutrients that are already reacted and soluble (as particle size no longer matters at that point in time). Of course, the pitfall here is to make sure it stays soluble—meaning that complexed or chelated nutrients are often more effective as they sidestep the theoretical issue of the molecule precipitating, and then being in the same boat as a colloidal or suspended particle.
All of this information brings us to an important point though: whether the molecule is in solution, a colloid, or a suspension, the plant still needs a certain amount of the nutrient that is a part of that molecule. I usually explain it like this: Iron has a molar mass of 55.845 g/mol or a diameter of approximately 0.024 nanometers. It doesn’t matter how small the particle size is of the iron molecule, or whether it’s in a solution, a colloid, or a suspension. The plant still needs to acquire a certain amount of that 55.845 g/mol iron. While the most efficient means to deliver a nutrient to plants is certainly up for debate (we’re still partial to amino acids and amino-acid polymers), plants will always need a certain amount of that nutrient for optimal growth. Not all nutritional formulations are equal, and some will allow the plant to acquire a larger percentage of nutrients than others (allowing for lower use rate, etc.). Still, there’s a limit to the efficiency of any nutritional formulation, and short of genetic engineering or breeding, plants will always require a certain amount of each nutritional element regardless of the particle size of the nutrient that’s applied.
Instructions for Growing The Sustainable Family Garden Heirloom Bugout Seed Bag
By Following The Recipe Below, You’ll Eat Healthier, Save Money, And Maybe Even Save Your Life!
Our bodies were designed to be herbivores, and as you eat primarily a whole food, plant-based diet you will be healthier, need less volume of food, avoid many chronic health problems, and live a longer, happier life!
Follow the Sample Garden Plan included at the link at the end of this article and you can eat fresh, healthy and tasty vegetables from your own garden – even one as small as 1/50th of an acre.
By planting a spring garden, a summer garden, and a fall garden (using the same beds over again) you can harvest as much as 1,600# of 24 different vegetables. That’s 4 1/3# per day of fresh home-grown food!!
You will make a very wise choice by starting with fresh seeds with a high germination rate. Good seeds are very inexpensive but SO important! We suggest you consider a multi-year storage pouch containing over 22,000 of the best Heirloom Seeds you can buy. True Leaf Market calls it the Emergency Heirloom Bugout Seed Bag, and you can get it here:
The Sample Garden Plan shows that your spring garden has only 7 plant varieties, with only 101 seeds that need to be grown beforehand and transplanted into the garden. Of the 1,104 seeds to plant 1,003 can be planted directly into the garden! Follow the Garden Planting Details Schedule at the link below for pretty much everything you need to know about when, where, and how to plant everything in your garden.
Growing your own seedlings is simple and straight forward. If you don’t know how to do this, consider getting the complete Mittleider Gardening Course book (www.growfood.com/shop), and just follow the instructions in Lesson 22. We’re only talking about 7 plant varieties, broccoli, cabbage, cauliflower, celery, kale, and the two lettuce, and most of them grow at about the same rate, so they can all be grown in a single 10″ X 20″ or 18″ X 18″ seedling flat, Place the celery on an outside row, as it is slower growing.
And for the plants you’ll put directly into the garden maximize yield and minimize thinning by mixing 1 part seeds with 100 parts sand, and distribute that mixture to give seeds the separation desired. Then give your plants protection in cold weather with PVC “mini a-frames” covered with 6 mil plastic, and a little heat on cold nights. Lesson 23 of the Mittleider gardening course book includes detailed instructions for this as well.
For your summer garden 151 seeds go directly into the garden, and only 52 seeds, including broccoli, cabbage, cucumbers, peppers, and tomatoes are best transplanted as seedlings into the garden.
Again, one seedling flat is ample. Just start your tomatoes and peppers about 8 weeks before you expect to put them in the garden, and the others – broccoli, cabbage and cucumbers – start 3-4 weeks before they go into the garden.
For the fall garden carrots and potatoes are planted directly in the garden. That’s 368 seeds, and 168 seeds of 5 others we recommend transplanting. Broccoli, cabbage and lettuce are best transplanted, and onions and turnips benefit from an early start in the seedling flat to allow them time to mature in the garden
Prune your plant leaves at least weekly, and EAT the edible leaves daily (listed as R/T)! Eating the outer leaves and celery stalks regularly keeps your plants producing for MANY MONTHS, increases your harvest substantially, and keeps them from going to seed. Notice that Kale, chard, and celery only need one planting for the entire growing season!
You are now on your way to getting more than 3/4 of a TON of vegetables, pretty much every variety you need and want, in order to sustain a healthy eating lifestyle.
As the total global population continues to rise and economic growth drives a transition towards more resource-intensive diets, a growing number of consumers are concerned with how to reduce the environmental impact of their dietary choices. Consumers often see organic food as an effective way to reduce their impact: surveys reveal that regardless of geographic location, the primary motivations for organic food purchases are health1 and environmental concerns.2 Furthermore, consumers are often willing to pay more for organic products – some studies indicate a willingness-to-pay of up to 100 percent above standard prices.3 But is this a wise choice? Is going organic really the best way to reduce the environmental impact of our diets?
Before we explore the relative impacts of organic vs. conventional agriculture, it is worth clarifying their definitions. Organic agriculture refers to the farming of crops or livestock without the use of synthetic inputs, including synthetic fertilizers, pesticides, plant growth regulators, nanomaterials and genetically-modified organisms (GMOs).4 Note that organic does not necessitate ‘chemical-free’ or ‘pesticide-free’; chemicals are often used in organic farming, however these cannot be synthetically manufactured, with the exception of a small number which have been approved by the National Organic Standards Board.5 Conventional (sometimes termed ‘industrial’) farming is therefore any agricultural system which uses one or more of the above synthetic inputs.
The methods applied for weed and pest control in conventional and organic systems can also impact on choices of planting and tillage techniques. Conventional farming often utilises synthetic herbicides for the control of weeds; this approach is typically more conducive to low- or no-till management techniques.6 Since herbicide applications cannot be widely adopted in organic farming (with some approved exceptions), options for no-till farming can be more limited and places greater emphasis on approaches such as mechanical controls and/or mulching.
In arable farming (which concerns the production of crops), nutrients can be added to the soil in the form of organic matter, such as green compost, animal manure (human sewage sludge is typically prohibited), or bone meal. For livestock, organic methods mean animals must be fed organically-certified feed (or graze on land with no synthetic chemical inputs), and antibiotics cannot be used throughout their lifetime (except in emergency cases such as disease or infection outbreak). In conventional livestock production, there are no constraints on feed certification and antibiotics or growth hormones are often used. Animal welfare standards for organic certification can vary by country, however for many, livestock must be raised with access to the outdoors (i.e. caged hens are not permitted). Conventional livestock farming covers a range of production methods: they can be produced in either ‘free range’ or ‘caged’ conditions. These are typically monitored and labelled as such on product packaging.
In this post, we present the empirical evidence comparing organic to conventional agriculture in terms of environmental impact. Despite strong public perception of organic agriculture producing better environmental outcomes, we show that conventional agriculture often performs better on environmental measures including land use, greenhouse gas emissions, and pollution of water bodies. There are, however, some contexts where organic agriculture may be considered appropriate.
Organic vs. conventional: what are the relative impacts?
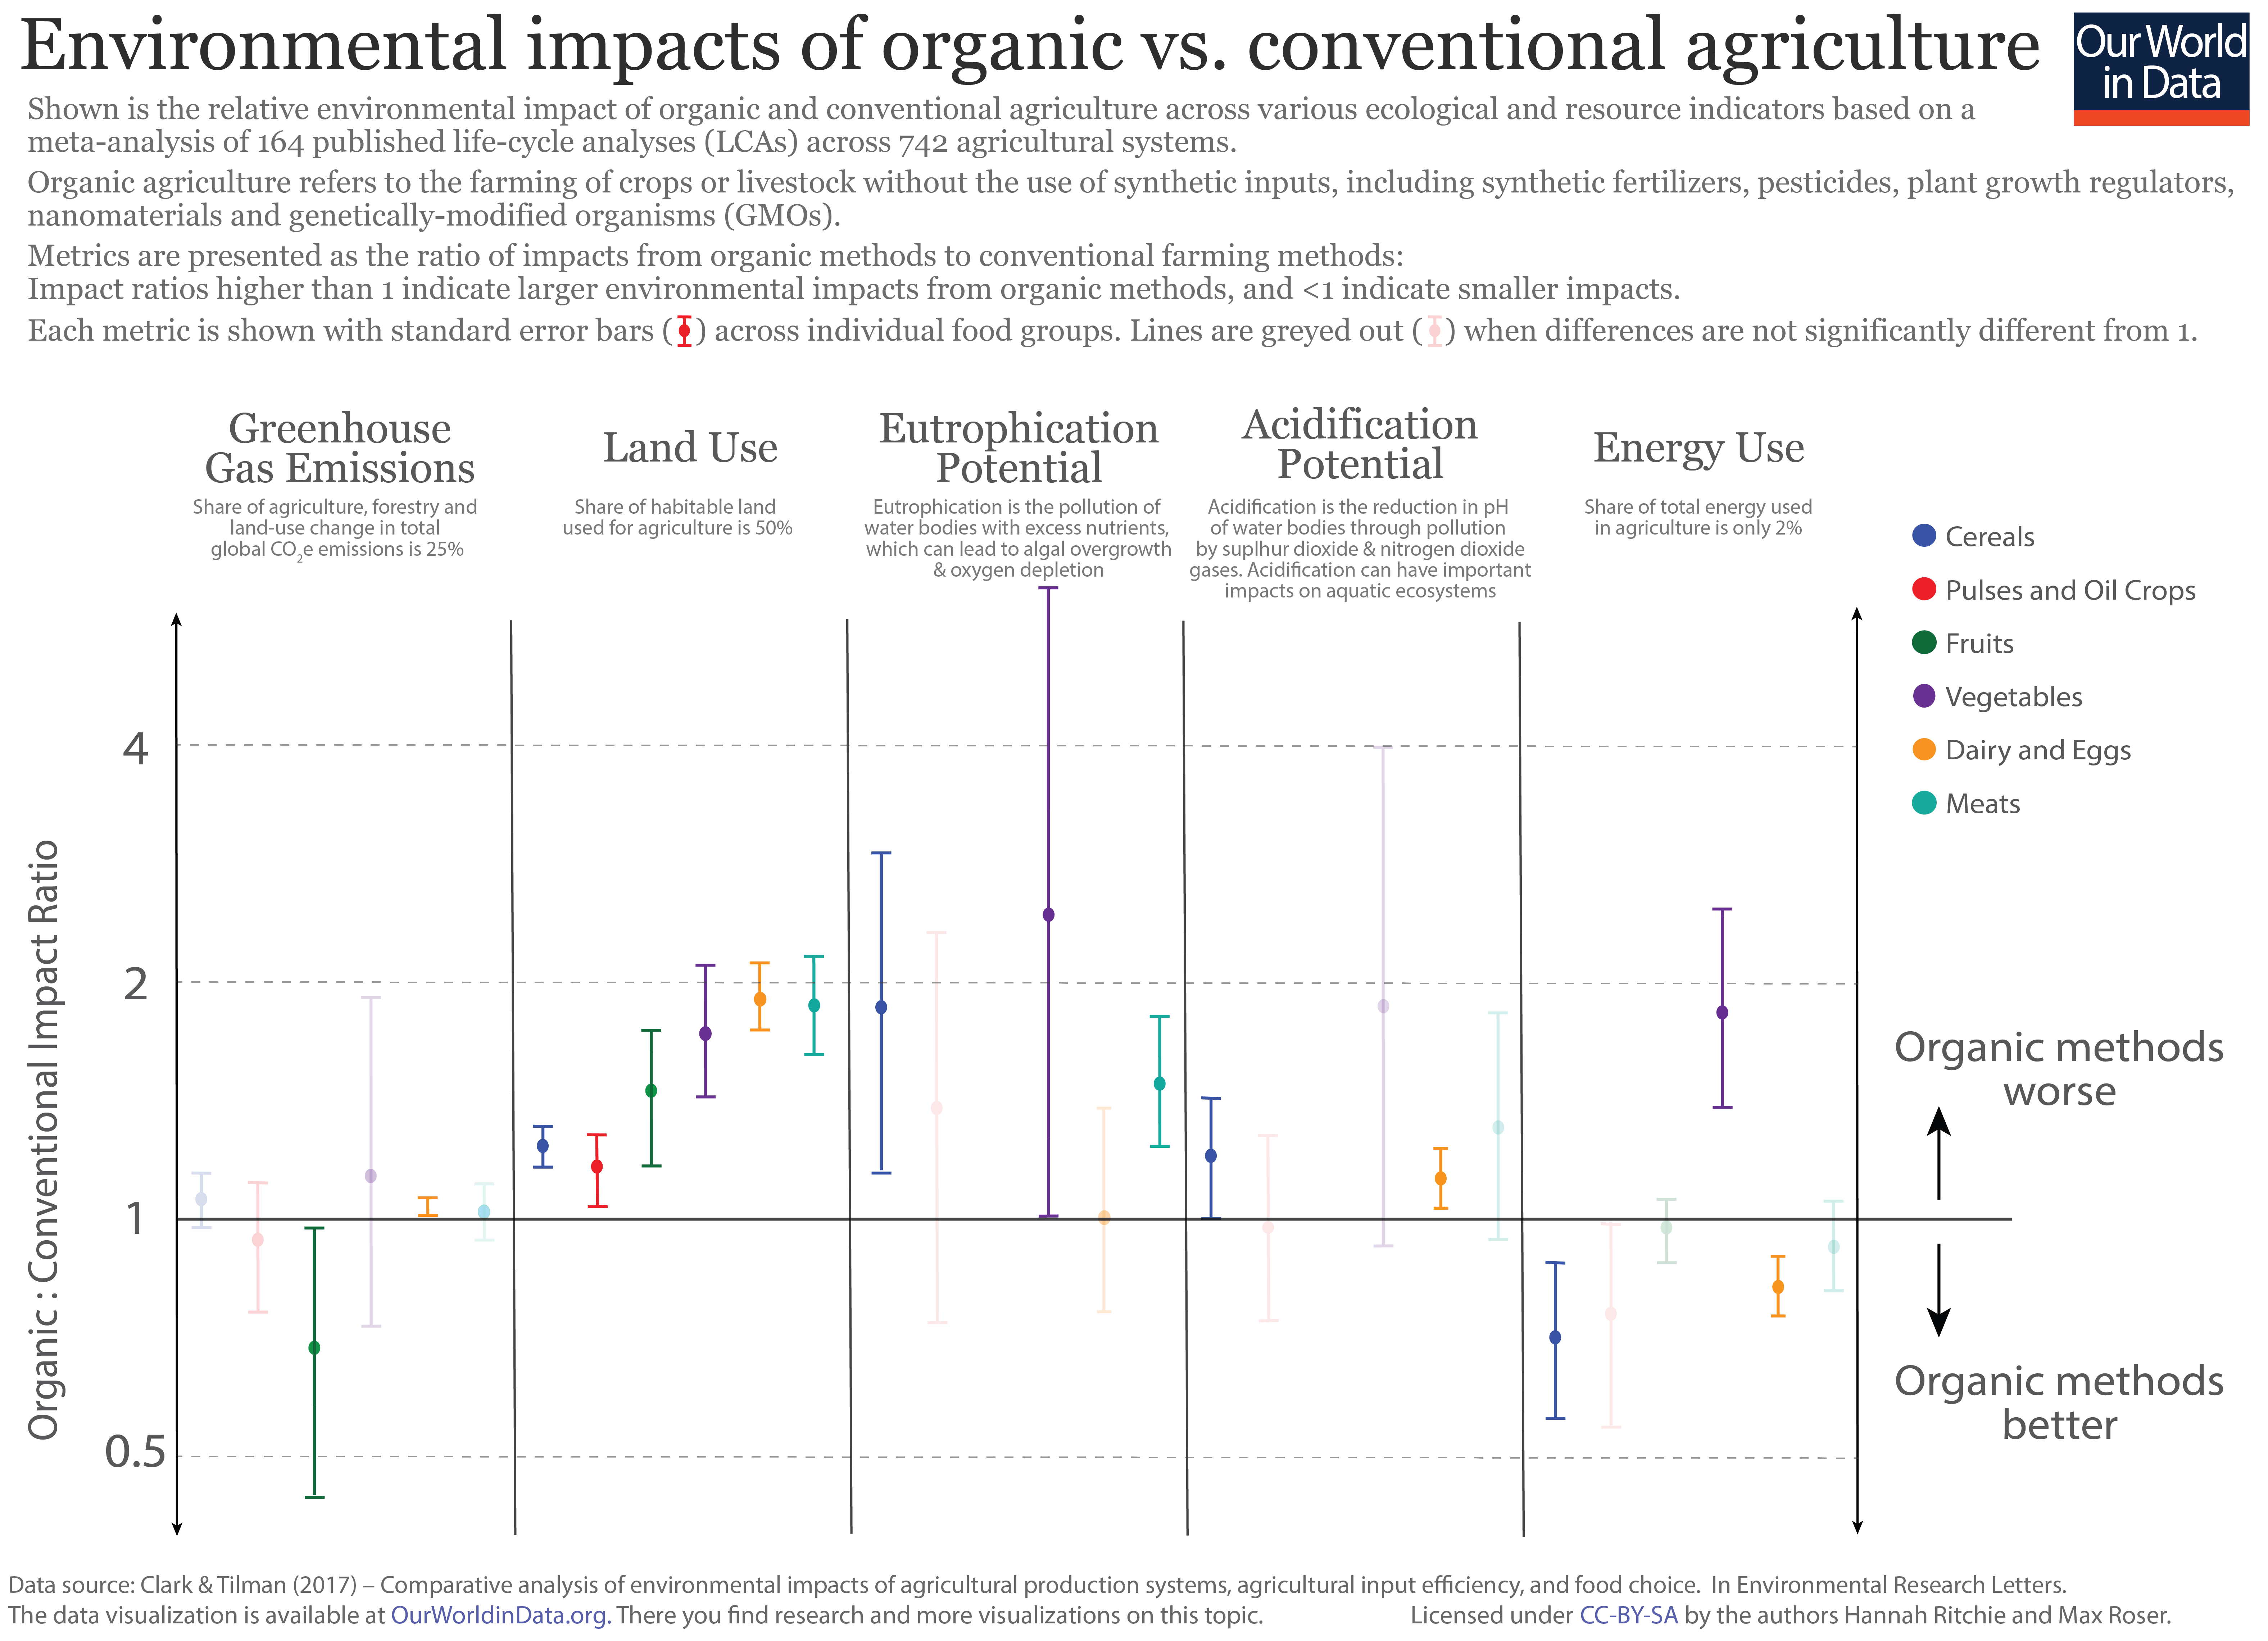
When aiming to provide a comparison of the relative impacts of organic and conventional agriculture, it can often be misleading and misrepresentative to rely on the results of a single comparative study: there will always be single, localised examples where the environmental impacts of a conventional farm are lower than that of a proximate organic farm, and vice versa.7 In order to provide a global and cross-cutting overview of this comparison, Clark and Tilman (2017) published a meta-analysis of results of published organic-conventional comparisons across 742 agricultural systems over 90 unique foods.8
Their analysis reviewed relative impacts across the range of food types – cereals, pulses and oilcrops, fruits, vegetables, dairy and eggs, and meat – and across a range of environmental impact categories – greenhouse gas emissions, land use, acidification potential, eutrophication potential, and energy use. ‘Eutrophication’ refers to the over-enrichment or pollution of surface waters with nutrients such as nitrogen & phosphorous. Although eutrophication can also occur naturally, the runoff of fertilizer and manure from agricultural land is a dominant source of nutrients.9 This disaggregation of food types and environmental impacts is important: there is no reason to suggest that the optimal agricultural system for cereal production is the same as for fruits; and there are often trade-offs in terms of environmental impact – one system can prove better in terms of greenhouse gas emissions but higher in land use, for example.
Food systems are made up of many phases – ranging from pre-farm activities, crop production, animal feed production, and harvesting, to transportation, distribution, and cooking. To fully and consistently account for the various stages of production, a process called life-cycle analysis (LCA) is used. LCAs attempt to quantify the combined impacts across several stages of production by considering all inputs and outputs in the complete process. The key in comparing LCAs between products is ensuring that the same number of stages of the supply chain are included in all analyses. For this meta-analysis, Clark & Tilman (2017) compared 164 LCAs which account for inputs pre-farm and on-farm (up until the food leaves the farm).
The aggregated results of Clark & Tilman’s study is shown in the chart below. This comparison measures the relative impact ratio of organic to conventional agriculture, whereby a value of 1.0 means the impact of both systems are the same; values greater than 1.0 mean the impacts of organic systems are higher (worse) (for example, a value of 2.0 would mean organic impacts were twice as high as conventional); and values less than 1.0 mean conventional systems are worse (a value of 0.5 means conventional impacts are twice as high). We see these relative impacts measured by food type across our range of environmental impacts with averages and standard error ranges shown.
We see large differences in impact patterns across environmental categories and food types. For some impacts, one system is consistently better than the alternative; whilst for others, results are mixed depending on crop type and the local agricultural context. The clearest results are for land and energy use. Organic systems consistently perform worse in terms of land use, regardless of food type. As we explore in detail in our entry on Yield and Land Use in Agriculture, the world has achieved large gains in productivity and gains in yield over the past half-century in particular, largely as a result of the availability and intensification of inputs such as fertilizer and pesticides. As a result, the majority of conventional systems achieve a significantly higher yield as compared to organic systems. Therefore, to produce the same quantity of food, organic systems require a larger land area.
This produces the inverse result for energy use. The industrial production of chemical inputs such as fertilizers and pesticides is an energy-intensive process. The absence of synthetic chemical inputs in organic systems therefore means that their energy use is predominantly lower than in intensive conventional agriculture. The exception to this result is vegetables, for which energy use in organic systems tends to be higher. Some of this additional energy use is explained by the use of alternative methods of weed and pest control in organic vegetable farming; a technique widely applied as an alternative to synthetic pesticide application is the use of ‘propane-fueled flame weeding’.10 The process of propane production and machinery used in its application can add energy costs – especially for vegetable crops.
Acidification and eutrophication potential are more mixed, but tend to be higher in organic systems; average values across all food types are higher for organic, although there are likely to be some exceptions in particular contexts. Why are organic systems typically worse in these measures? The supply of nutrients in conventional and organic systems are very different; nitrogen supply in conventional agriculture is supplied with the application of synthetic fertilizers, whereas organic farms source their nitrogen from manure application. The timing of nutrient release in these systems is different: fertilizers release nutrients in response to crop demands, meaning nitrogen is released when required by the crops, whereas nitrogen released from manure is more dependent on environmental conditions, such as weather conditions, soil moisture and temperature.
Nutrient-release from manure is therefore not always matched with crop requirements – excess nutrients which are released but not taken up by crops can run off farmland into waterways such as rivers and lakes. As a consequence, the pollution of ecosystems with nutrients from organic farms are often higher than conventional farms, leading to higher eutrophication and acidification potential.
Across all food types, there is no clear winner when it comes to greenhouse gas emissions. Results vary strongly depending on food type, although most lie close to a ratio of one (where differences in impact between the systems are relatively small). Based on average values, we might conclude that to reduce greenhouse gas emissions, we should buy organic pulses and fruits, and conventional cereals, vegetables, and animal products. In general, the greenhouse gas emission sources of organic and conventional systems tend to cancel each other out. Conventional systems produce greenhouse gases through synthetic fertilizer production and application, which is largely balanced by the higher emissions of nitrous oxide (a strong greenhouse gas) from manure application.11
Should we treat environmental impacts equally?
Organic agriculture proves better for some environmental impacts, and conventional agriculture for others. These trade-offs can make it difficult to decide which we should be choosing. But should we be considering all environmental impacts equally? Should some have higher importance than others?
To evaluate these trade-offs we have to consider a key question: how important is agriculture’s contribution to global greenhouse gas emissions, land use, acidification and eutrophication potential, and energy use? Agriculture’s role in land use, greenhouse gas emissions, and energy use is summarised in the three charts below:
The first chart shows that agriculture, forestry and other land use (AFOLU) is the dominant land user, consuming half of the world’s habitable land;
The second chart shows that it accounts for approximately one-quarter of greenhouse gas emissions;
The third chart shows that it accounts for only two percent of energy use;
The contribution of AFOLU to acidification and eutrophication is more difficult to quantify, however it is widely considered to be the dominant source of nutrient input to aquatic ecosystems.
We might therefore conclude that energy use – the only category in which organic agriculture has a clear advantage – is comparatively substantially less important than other impacts.
Greenhouse gas emissions by sector, World
Breakdown of total greenhouse gas emissions by sector, measured in tonnes of carbon-dioxide
equivalents (CO₂e). Carbon dioxide equivalents measures the total greenhouse gas potential of the full
combination of gases, weighted by their relative warming impacts.
If we are most concerned with areas of environmental change for which agriculture has the largest impact – namely land use, water pollution, and greenhouse gas emissions – for which conventional agriculture tends to be advantaged, is the answer to make global farming as intensive as possible? Not necessarily. There are several reasons why this view is too simplistic.
The impacts quantified here fail to capture another important ecological pressure: biodiversity. Conclusive comparisons of the relative impacts of agricultural systems on biodiversity are still lacking. Biodiversity is affected by a number of agricultural impacts, including pesticide application (which can be toxic to some species), soil erosion, and disruption from land tillage methods, and either habitat destruction or fragmentation.12 Intensive agriculture undoubtedly has severe impacts on local biodiversity.13 A recent study by Hallmann et al. (2017) reports a greater than 75 percent decline in insect populations over the last 27 years; although unclear as to the primary cause of this decline, it’s suggested that pesticide use may be a key contributing factor.14 Organic farming systems also impact biodiversity, but perhaps less dramatically per unit area, due to lower fertilizer and pesticide use. However, as our land-use metrics show: organic agriculture requires far more land than conventional agriculture. This creates a divide in opinion of how best to preserve biodiversity: should we farm intensively over a smaller area (with understanding that biodiversity will be severely affected over this area), or should we farm organically, impacting biodiversity (perhaps less severely) over a much larger area.15 There is no clear consensus on how best to approach this issue.
Another point to consider is that conventional agriculture is not necessarily better across all food types. Context, both in terms of the food commodity and the local environment, can be important. For example, if greenhouse gas reduction is our main focus, we might be best off eating organic pulses and fruits, and conventional cereals, vegetables, and animal products, based on the results presented above.
This leads us to three key conclusions in the organic-conventional farming debate:
The common perception that organic food is by default better, or is an ideal way to reduce environmental impact is a clear misconception. Across several metrics, organic agriculture actually proves to be more harmful for the world’s environment than conventional agriculture.
The debate between organic and intensive agriculture advocates is often needlessly polarized. There are scenarios where one system proves better than the other, and vice versa. If I were to advise on where and when to choose one or the other, I’d advise trying to choose organic pulses and fruits, but sticking with non-organic for all other food products (cereals, vegetables, dairy and eggs, and meat).
The organic-conventional debate often detracts from other aspects of dietary choices which have greater impact. If looking to reduce the environmental impact of your diet, what you eat can be much more influential than how it is produced. The relative difference in land use and greenhouse gas impacts between organic and conventional systems is typically less than a multiple of two. Compare this to the relative differences in impacts between food types where, as shown in the charts below, the difference in land use and greenhouse gas emissions per unit protein between high-impact meats and low-impact crop types can be more than 100-fold. If your primary concern is whether the potato accompanying your steak is conventionally or organically produced, then your focus is arguably misplaced from the decisions which could have the greatest impact.
Land use per 100 grams of protein
Land use is measured in meters squared (m²) per 100 grams of protein across various food products.
Greenhouse gas emissions are measured in kilograms of carbon dioxide equivalents (kgCO₂eq) per 100
grams of protein. This means non-CO₂ greenhouse gases are included and weighted by their relative
warming impact.
Winter’s the time to get ready to grow your own seedlings! It’s not really difficult, and can extend your growing season by many weeks. For example, by planting cabbage, broccoli, and cauliflower in February in your basement under grow-lights, you can put large, sturdy transplants into your garden by the end of March or early April, and be eating them when others are just seeing them come up!
Remember that photosynthesis, using light, heat and moisture causes plant growth. Therefore you must follow a few key natural principles very carefully, or you will be disappointed.
First, seeds must have moisture to germinate and grow. And the soil mix must be moist, but not soggy, or you’ll drown the new plant, since it must also have oxygen!
Second, while heat is essential, temperatures must be maintained in a narrow range for ideal germination to occur. Most vegetable seeds germinate quickly between 75 and 80 degrees Fahrenheit. After plants are up, many of them will grow in cooler temperatures, but most all will become dormant (stop growing) at temperatures below 50 degrees.
Third, light is not necessary for seed germination, but as soon as your seedlings begin to emerge from the soil, maximum light is required immediately for proper development. Therefore, to grow in your house, make sure your plants have a strong (but not hot!) light source directly on the plants, for up to 16 hours per day. Note the pictures of two grow-light shelves in the Gallery Section. The metal one is 6-shelf Commercial Chrome Shelving, from Sam’s Club costing only $70, and will hold 20 flats of plants. Suspend shop lights with 2 cool and 2 warm 40-watt tubes 4 to 6″ above the plants, or use more efficient LED grow-lights .
The fourth principle relates to feeding. A balanced nutrient mix of 13 minerals is essential to plants immediately after germination. Those nutrients are mineral salts and must be very dilute in the soil moisture, otherwise osmosis will cause the salt to draw the life-giving moisture out of the plants, and they will die. To ensure you never burn your plants, water seedlings daily using the “Constant Feed Solution” of one scant ounce (2 almost level tablespoons) of Weekly Feed dissolved in 3 gallons of water. To make the Weekly Feed Mix simply add one small packet of the Micro-Mix, which is available on the Foundation’s website listed below, with 4# of Epsom Salt and 25# of 16-16-16.
Next, it is important to separate your small plants before their leaves begin to overlap with others’, or the tiny stems will become very weak and spindly as the plants all stretch – looking for more light. By the time the plants have their first or second true leaf this step should be completed. Failure to act for even a few hours can result in spindly, weak plants, which sometimes never recover. Transplanting seedlings into 2″ 6-paks or pots will provide adequate space for them to grow an additional 2-3 weeks, depending on variety. If it’s still too early to put them out into the garden by the time plant leaves are again beginning to overlap, prune the leaves, transplant again into larger pots, or separate pots, so the plant leaves always have maximum light.
Before transplanting into the garden, “harden-off” your plants outside, off the ground for 2 to3 days, to acclimate them to direct sunlight, temperature, wind, etc. This is important so the plant doesn’t have the shock of a new environment added to the shock to its root system caused by transplanting. If the weather turns cold at night, bring the plants back in the house. The temperature adjustment needs to be gradual.
For many of your plants, the pruning process does double duty. In addition to assuring maximum light, it shocks the plant mildly, causing it to pause in its growth and produce a thicker, sturdier stem. This process makes the plant much better able to endure the vicissitudes of the outside environment, such as cutworms, ants, etc. that often quickly decimate plants with weak, spindly stems.
For tall-growing plants, like tomatoes, be sure to provide small stakes tied to the plant stem, to prevent them from falling over. And with tomatoes, begin immediately to remove all sucker stems as soon as possible, to assure a single, strong stem and maximum production from your plant.
Great growing instructions can be found in the book Let’s Grow Tomatoes, available as a digital download and as a part of the Mittleider Gardening Library CD. It’s available at www.growfood.com/shop.
 In my travels, the subject of fertilizers comes up often. In these discussions, we sometimes center on the topic of fertilizer particle size—specifically when someone asks me about “nanoparticle” fertilizer. When it comes to liquid fertilizers, the difference between whether something is a solution, a colloidal dispersion, or a suspension depends on the particle size. I thought a brief discussion on the matter might shed some light on this exciting topic and make us better-informed consumers.