About
Shop
FAQ
Freebies
Gallery
Why Tomato Blossoms Fail to Pollinate and Produce Fruit
The following is adapted and condensed from the book Let’s Grow Tomatoes, by Dr. Jacob R. Mittleider.
In addition to the 13 essential mineral nutrients man can provide, plants require water, exercise, anchorage, sunlight, warmth, living space, and protection from extremes in weather, disease, and insects. This would indicate that there are many possible causes for your garden to fail at producing a crop, and this is true. However, there are a few common problems which deserve special attention.
Nematodes – Soils everywhere are infested with these tiny eel-like worms that eat into the roots of plants and live off the plant juices. Infected roots have irregular brown-colored swellings which appear like rough knots. Infestation can be serious without affecting plant color or other visual appearance. Failure to set fruit is usually the first indication the grower has of the problem. Producing fruit places a heavy load on the plant, and if nematodes are present the plant will abort the fruit in order to stay alive. Because the plant cannot expel the nematodes it continues the same process, with new stems, leaves, and flowers, and being unable to support the burden of producing fruit, it aborts the new fruit at or near conception.
Lack of complete and balanced fertilizer – A proper balance of all 13 nutrients is essential for optimum performance, and a deficiency in even one nutrient can result in crop failure. See the 3 volume set of The Garden Doctor books by Jacob R. Mittleider for details on deficiency symptoms and solutions.
Insects and soil maggots – Tomato fruit worms eat the new fruit as it is formed, and thrips eat the pollen and prevent pollination. Soil maggots eat the stem below the soil surface and weaken the plant similar to nematodes. A regular dust or spray program is necessary to control the first two, and a Diazanon drench will eliminate the soil maggots.
Weather Problems and air movement – Temperatures above 95 degrees Fahrenheit will cause tomatoes to stop setting fruit, and below 50 degrees there is almost no plant growth, so protecting against those extremes is very important.
Heat can be reduced by using shade cloth, and plastic coverings can increase temperatures – at least during the day. However, care must be taken to avoid losing essential sunlight, since that is the number one law of plant growth. Fruiting crops will not produce without direct sunlight for 6-8 hours each day. 25-35% shade cloth that shades the plants during the hottest part of the day is recommended where daytime temperatures are consistently above 100 degrees Fahrenheit.
Some growers believe that greenhouse-grown tomatoes may fail to pollinate if there is no air movement. They try to resolve this by vibrating the vines occasionally. Dr. Mittleider has never experienced difficulty from this source, and our experience has been that pruning, guiding plants up the baling twine strings, and removing sucker stems provide adequate movement for self-pollination to occur (the flowers are self-pollinated because tomato flowers are “perfect”, including both male and female parts).
Diseases – If your tomato plants are suffering the effects of disease the symptoms are usually very evident, and are not limited to pollination or fruit set to know that something is wrong. Rotation is sometimes recommended to minimize problems, however the family garden is rarely large enough to allow the separation needed to be very effective. Fungus diseases can often be controlled by a good and timely spray or dusting program. The chapter on Diseases in Let’s Grow Tomatoes is recommended for a more in-depth discussion of this subject.
Let’s Grow Tomatoes is available as a digital download at Food For Everyone Foundation – http://www.growfood.com/Shop.
Organic Or Chemical – Or Both? What Kind of Vegetable Garden Should You Grow
Today we will discuss a fundamental question in gardening. Previously I was posed this question: “I hear that chemicals are poisoning our waterways, and that organic growing is much healthier than using chemicals. What’s the truth, and how do I grow a healthy, productive, and sustainable garden without hurting the environment?”
This important question deserves an accurate answer. Therefore let’s learn about plant nutrition. First, plants receive nutrition only as water-soluble mineral compounds through their roots. When we put plants, compost or manure into the soil, the organic material must first decompose, and the nutrient compounds must revert to water-soluble minerals before the next generation of plants can use them. This takes time, and sometimes as much as half of the nutrients are lost in the decomposition process. Nitrogen is particularly susceptible to loss because it is volatile and returns to the air very easily.
Second, there is no real difference between organic, and mineral or chemical nutrients. Everything in this world is chemical! To the chemist the elements in the soil are called chemicals, to a geologist they are called minerals, and to an organic enthusiast they are called organics, but they are the same substances. To quote J. I. Rodale, the publisher of Organic Gardening magazine, “we organic gardeners have let our enthusiasm run away with us. We have said that the nitrogen which is in organic matter is different (and thus somehow better) from nitrogen in a commercial fertilizer. But this is not so.” And “actually there is no difference between the nitrogen in a chemical fertilizer and the nitrogen in a leaf.”
Third, there is no difference between soil and rocks except for the size of the particles, and 12 of the 13 mineral nutrients plants require are essentially ground-up rocks! They are natural, and there’s really nothing “synthetic” about them.
So you see, there is no difference between “organic nitrogen” and mineral or chemical nitrogen, except two primary things. 1) the nitrogen that is part of an organic substance must decompose and revert to the water-soluble mineral state before being available to plants, and 2) mineral-source nitrogen is much higher in nutritional content, so much less is required to feed your plants.
As further evidence that mineral nutrients are not bad per se, I’ve researched which fertilizers meet the requirements for qualification as a Certified Organic garden, and 12 of the 13 nutrients we use in a Mittleider garden are approved. And the 13th – nitrogen – is the one that’s most often used by organic gardeners, both in the garden and to aid in composting! Go figure.
This being the case, what should you do to assure you have the best garden and the healthiest plants possible? Give your plants accurate dosages of the best combination of nutrition you possibly can. The Mittleider natural mineral nutrient formulas are available in The Mittleider Gardening Course book at www.growfood.com/shop. You can mix your own “from scratch”, or get the micro-nutrients from the Foundation website, also in the Shop section. And never over-use any kind of fertilizer. Both manure and mineral compounds will harm our water supply if allowed to leach into the water table.
Meanwhile, remember that 99% of us depend on 1% to feed us, and commercial growers feed their crops! They use formulas like ours and call them “The preferred horticultural mix.” Just check out Scott’s Peter’s Professional Pete Lite as an example.
This is not to say that organic materials don’t have a place in the garden. You can improve soil texture and tilth by adding materials that have desirable characteristics, and even add some nutrient value. However, improving the soil in that way is not necessary to having a good garden, and people often introduce weeds, rodents, bugs, and diseases into their gardens, or provide a haven for them with their organic mulching practices. It is for this reason that we do not emphasize or encourage composting and manure.
Mittleider gardens qualify as “organic” because we don’t use pesticides or herbicides. However, I suggest they are even better than organic, because the plants receive just what they need, they grow fast, and we rarely have debilitating insect or disease problems because there are no weeds to provide a home, and the plants aren’t in the ground long enough for the pests to get established.
Dr. Jacob Mittleider’s gardening books, CDs, and Software, as well as natural mineral nutrients, are available at the Foundation website -www.growfood.com/shop
Free Vegetable Gardening Seminars – Tips & Techniques to Turn a Weed Patch into the Garden of Eatin!
I am delighted for the opportunity of presenting free ½-day vegetable gardening seminars again this winter and next spring to groups who request them. My availability is necessarily limited, and timing is critical, so get your church, community, or gardening club involved now!
Seminars include 2+ hours of fast-paced video instruction in the classroom, and 2+ hours of demonstration and practice in the garden. Your group will learn the unique world-renowned Mittleider Method of vegetable gardening that’s been called “the best of organic”, “better than organic,” and “the poor man’s hydroponic system,” and that promises you a great garden in any soil and in virtually any climate.
Whatever size garden you have to work with – whether 100 square feet or one acre; whether on a patio, in containers, or in the dirt; and whether it’s organic, or even hydroponic, you will learn to solve your unique problems and improve your gardening success. And you’ll enjoy gardening for a change!
You’ll learn tips and techniques for maximizing your limited space – eliminating weeds – using less water more efficiently – increasing yields – improving quality – extending your growing season – and minimizing problems with bugs and diseases.
Next summer you can eat fresh garden-grown tomatoes almost as soon as others are getting theirs established and growing in the garden! And you can still be enjoying them in December, long after your neighbors are paying top prices for “plastic” store-bought varieties. And you don’t need expensive greenhouses or hydroponic equipment to do it!
Dr. Jacob Mittleider developed these methods specifically for family gardeners all over the world. And we keep the procedures simple and the costs down, so that families, whatever their financial situation, can grow their own food and achieve health, self-sufficiency, and independence, while enjoying the experience.
You’ll want a large group (50-100 minimum) and a tilled garden space near the classroom (2-3 minute drive maximum), to assure the maximum benefit for all participants.
Email the Foundation with the details of your request at jim@growfood.com, or call 801-915-4449 or 888-548-4449. Let’s make 2020 the best, most productive, and most enjoyable gardening year you’ve ever had! i had great results with my husband when i use Tadalista wich i received from http://buymdonline.com/tadalista/ i bought generic tadalafil under brand name Tadalista, guys ship medications from India
Meanwhile, if you live too far away, or can’t get a large group together, you can get most of the benefits of an in-person seminar by ordering the Gardening Seminar DVD , or the Mittleider Gardening Library CD from the Foundation at https://growfood.com/shop. And if you don’t already have it, the latest edition of The Mittleider Gardening Course book is 304 pages – all in color, with 150 great garden pictures and dozens of illustrations – of the best gardening book on the planet. Get yours now!
Planning Next Year’s Vegetable Garden – What Could You Produce?
Many people arrive at the end of the gardening season and wish they had planned their vegetable garden better. Often there is wasted space, and sometimes we have grown things that were not used, and perhaps couldn’t even be given away.
Now is a good time to begin planning for next year’s vegetable garden – to make sure you realize the greatest benefit from your valuable time and available space, and that you make the most of those precious 6 months of growing which nature provides us.
First you should decide what your garden is used for. Is it for casual use, with just a few things grown for fun, or do you depend on it as a major source of your family’s food? Next, decide what kinds of things are best to grow – juicy tomatoes, or that new triple-sweet corn. And then plan for how much of each thing you will grow.
How your garden is used depends on 1) whether or not you’re able or willing to devote serious effort to your garden, 2) whether you expect to feed your family just during the growing season or for the entire year, 3) what things your family likes to eat, 4) will there be supplementation from other sources, or will you be depending on your garden completely, and 5) do you want or expect to earn money from the sale of your produce.
An excellent and comprehensive database of commonly grown vegetables, with when, where, and how they can be grown, as well as how much they will produce (14 total categories of important information), is contained in The Mittleider Gardening Course book, on page 262. This document is a wonderful resource for the serious family gardener, and can be found at https://growfood.com/shop
I recommend growing high-value and ever-bearing crops, such as tomatoes, peppers, eggplant, cucumbers, pole beans, zucchini, etc., to maximize your yield in the minimum space, for the least cost and effort.
Let’s assume you have a large family you want to feed from your garden, but that you only have 1/16th of an acre that can be used for this purpose. I’ll give examples of what can be grown in 30′-long soil-beds.
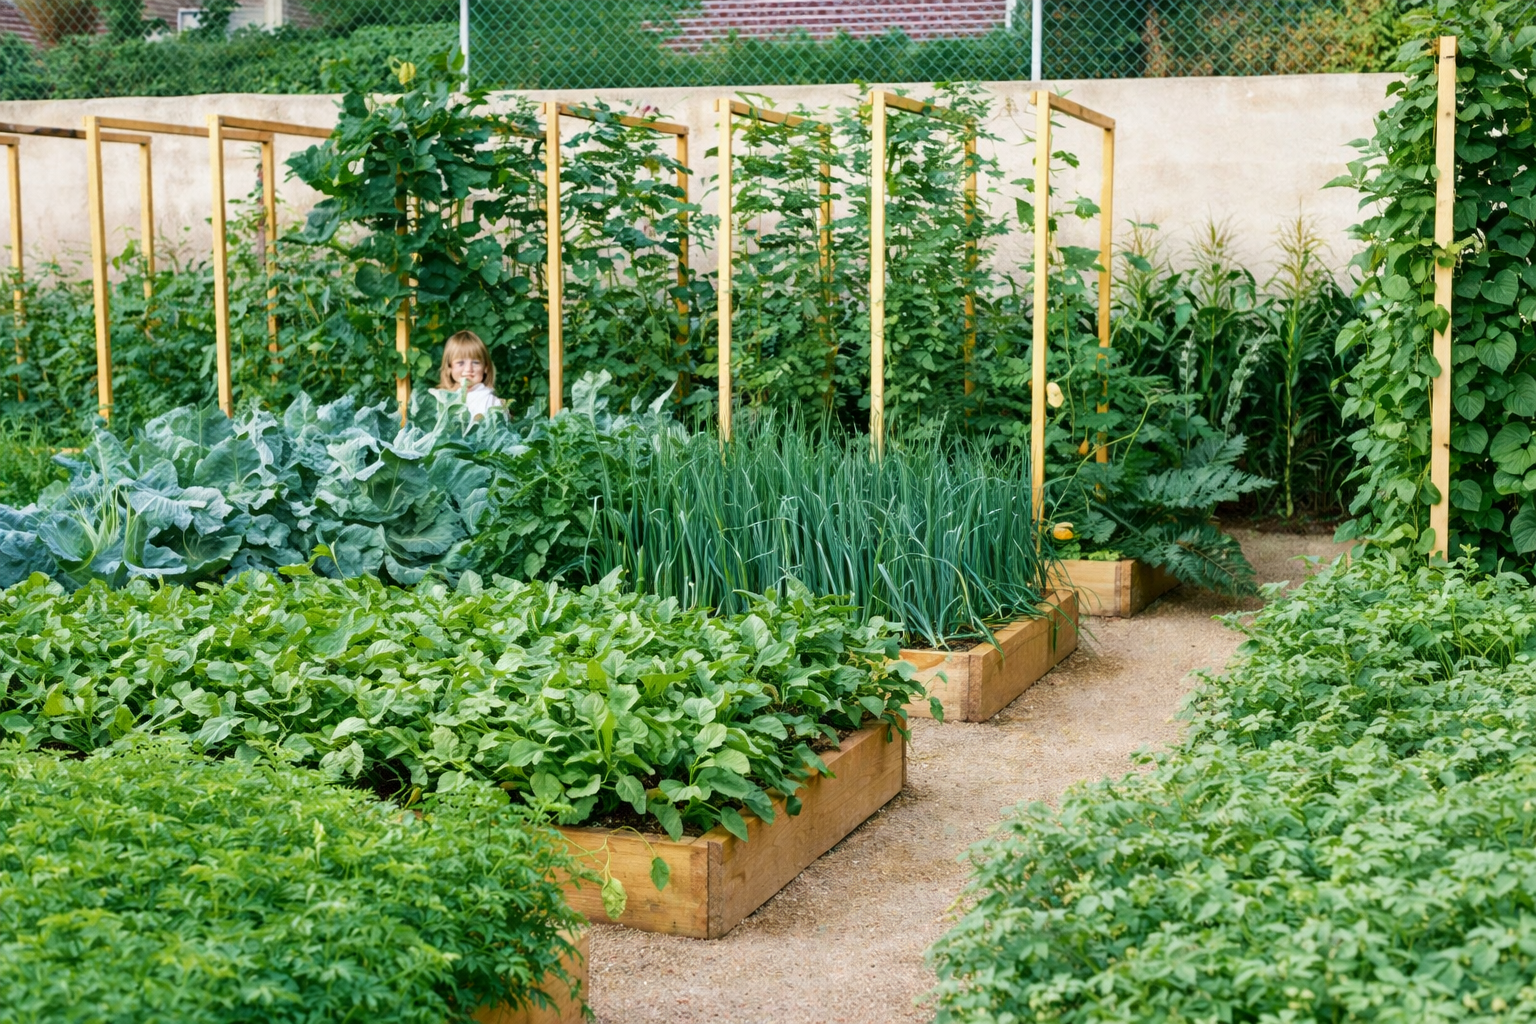
On 1/16th of an acre you should be able to grow sixteen 30′-long soil-beds that are 18″ wide, with 3 ½’ interior aisles and 5′ end aisles.
In the early spring you should start growing many frost-tolerant extremely healthy greens, such as Swiss chard, kale, collards, celery, broccoli, leaf lettuce, cauliflower, and radishes. Virtually the entire plant is edible on each one of these, and for the best health benefits as well as the most production, you will want to learn to prune the outer leaves of all of these – every week – and eat them. Doing this can change celery from a “one and done” crop to something you can eat for 9 months! And most of the others are the same. And they don’t take up a lot of space! Plan on having these 8 crops in just 2 beds. Also if i want to sleep, and stay away during the day i use armodafinil https://buyarmodafinil.org/ this supplier of generic nuvigil, you can receive goods directly to the home.
Using vertical growing with the Mittleider Method (which includes “the best of organic” gardening, container gardening, “the poor man’s hydroponic” gardening, and soil gardening), your garden should produce the following amounts of fresh, healthy and tasty vegetables:
2 beds of indeterminate tomatoes – 1,500-2,000# of tomatoes from July through October.
1 bed of sweet peppers – 250-500 peppers.
1 bed of eggplant – 250-500 eggplant.
1 bed of cucumbers – 400-800 cucumbers.
1 bed of pole beans – 200-400# of beans.
1 bed of summer squash – 250-500# of summer squash.
So far we’ve only used 9/16ths of the garden, and you have more than enough vegetables to feed the family during the growing season, with excess to sell or give away. Doubling the space of these 6 crops could provide income to buy other food staples, and/or provide sufficient to dry or bottle food for the winter months.
Growing easily-stored food in the other 7 beds in your garden, such as potatoes, cabbage, beets, onions, garlic, turnips and carrots, most of which can produce two crops in a growing season, can provide the family fresh food during the growing season AND through the winter. You should be able to produce the following amounts, and if you will provide proper cold storage these can be usable for up to 6 months.
1 bed of carrots – 200-400# of carrots.
1 bed of cabbage – 200-400# of cabbage.
1 bed of beets – 100-200# of beets.
1 bed of onions – 200-300# of onions.
2 beds of potatoes – 400-600# of potatoes.
In this scenario you have one bed left to plant. Crops like corn, large squash, and watermelon should only be grown if you have ample EXTRA space, because they take much space for the yield they produce. For example one bed of corn should produce about 90-100 ears of corn – all within about 2 weeks, whereas a bed of tomatoes should produce 750-1,000 POUNDS of tomatoes, spaced over 4 months.
Take the time now for this important planning exercise. Have your family decide what they want to eat, calculate the amounts of each vegetable needed, and then plan your space so you can grow at least that much in your garden.
Good Growing!
Preserving your Vegetable Garden Harvest – Eat Garden-fresh for 4-6 Months!
Folks, this one’s a keeper, so turn on your printer and save it in your vegetable gardening library.
With cold weather soon upon us, everyone should be working to save your harvest, either by storing or preserving. Canning, drying, and freezing are good ways of preserving your crops such as beans, corn, peas, peppers, summer squash, and tomatoes. They need to be done immediately after picking, while crops are fresh and tasty. Whether you cold-store or preserve your produce depends on the type of food you’ve grown, your facilities, and your family’s eating preferences.
Cold storage of vegetables such as cabbage, beets, carrots, potatoes, squash, and turnips can give you the best tasting and healthiest food of the four methods (with the possible exception of freeze-drying, if that is an option for you), and may even be the least expensive in the long run. And you can eat every one of these garden-fresh even 4 to 6 months after they’ve been harvested! However it requires some careful preparation, so let’s discuss how best to prepare for and store your fall harvest.
The details of harvesting and properly storing your crops are covered in several of the Mittleider gardening books, including Food For Everyone. All are available at https://growfood.com/shop
Since tomatoes are many peoples’ favorite garden produce, let’s discuss them first. Before the first killing frost, pick all your tomatoes, including the green ones. Handle them gently, because cuts or bruises will cause them to spoil quickly. Fruit that’s close to ripe can be placed on a kitchen counter, out of direct sunlight, and it will ripen in a few days. Green fruit should be placed on a shelf in a cool, dry place, such as your basement or garage. As they begin to ripen you can bring them into the kitchen. Always remove any fruit that is beginning to spoil. We eat tomatoes into January this way.
Most of your other vegetables need more help to keep them fresh. If your garden is very small and you don’t have much to store, you may be able to use an old refrigerator, or a barrel buried in the back yard. However, for those who are serious about providing fresh food for your families, I recommend a root cellar, either under the house or buried outside. A good size is 8′ wide and at least 10′ long. This gives you 2′ for an aisle and 3′ on each side for storage. A shelf on each side is good for things like onions and garlic, which need to be kept dry.
You can set it into the side of a hill or dig a hole 4′ to 5′ deep in a corner of the yard, build the cellar, and cover it with the excess dirt. This will help insulate it and maintain the low, but not freezing temperatures you need. Provide yourself a small door and insulate it well.
Harvest your crops at peak maturity and store only those which are free of disease or damage. Don’t harvest for storage until late fall, since more starches are converted to sugars by the cool weather. Root crops should be picked fresh and stored immediately. Potatoes and squash, on the other hand, first need to be cured at 60-75 degrees for 7 to 14 days. Most produce should be stored at just above freezing temperatures, except winter squash, which does better at or above 50 degrees.
Your root crops will stay fresh and sweet for months if you harvest them with roots intact and pack them in wet sawdust. Cabbage and other brassicas also need their roots. Remove outer leaves, then pack the roots in wet sawdust, leaving the cabbage exposed. Provide separation between crops to avoid mixing flavors, and to keep squash dry.
Potatoes should not be as wet as the root crops. They will do well in temperatures below 40 degrees, but pack them in slightly moist, rather than wet sawdust. Peat moss and sand, or combinations of all three, can be substituted for straight sawdust, but are not as ideal. I recommend you work with your neighbors to find a sawmill, pallet manufacturer, or cabinet shop that uses hardwoods (not walnut!), and obtain a truckload.
Onions and garlic also store well. They can handle cold temperatures but, like winter squash, they do better with humidity only 60 to 70 percent. Therefore these should be up off the damp floor, on shelves or hung from the ceiling. A cold basement can also work, but be sure to provide separation from living areas to avoid the strong smell.
Remember, cold temperatures are essential for good long-term storage of vegetables, but do not let them freeze! Insulate your root cellar well. Good healthy eating to you! More details are at http://www.growfood.com in the FAQ section.
Natural or Synthetic Fertilizers In the Vegetable Garden- What’s the Difference & Which Should I Use
What does “Natural” mean, and what does “Synthetic” mean? And exactly what makes synthetically produced fertilizers, if there is such a thing in the first place, any worse for your garden than naturally produced ones? This is one area in which a lot of balony gets thrown around – and regrettably believed by many good people.
The simplest and most natural of the commercial fertilizers is probably lime. It’s also almost universally recognized as important, and used by every kind of gardener who knows what he’s doing and has access to it. The world has an inexhaustible supply of limestone (calcium carbonate), and it’s simply ground to powder in powerful rock crushers, bagged, and sold to the public. We even receive much of our magnesium from the same process, when the raw material is dolomitic limestone (labeled as dolomite lime).
All twelve of the other nutrients man can control are also mined from the earth. However, we have learned over time how to remove impurities, such as heavy metals, and increase the concentration of the individual nutrients, by running them through a simple concentration process. This is often just a sulfuric acid bath, which leaves us with a much higher concentration of the original nutrient, plus sulphur, which is itself a very important nutrient. This is one reason most of the nutrients come as a combination with sulfate (zinc sulfate, copper sulfate, etc.).
So, we benefit by getting a much higher concentration of the nutrient we want, plus sulphur, with no heavy metals, and it costs MUCH less to ship to our locations, because it weighs only a fraction of the original raw material.
Are those fertilizers synthetically produced? I don’t think so, but perhaps they are by some peoples’ definition.
Did you know that even nitrogen is mined out of the ground? This may surprise many people, but it actually is – in Chile, South America – where huge mines of sodium nitrate exist. But can you imagine the cost to get it to the USA, though? And what would we do with the sodium salts??
Thank goodness we have found a better, more efficient, and therefore far less costly way to produce nitrogen fertilizers.
About 105 years ago two German scientists, Fritz Haber and Karl Bosch, discovered and commercialized the process by which nitrogen could be separated from other elements in different compounds and made available as fertilizer. This discovery arguably served as the single most important component leading to exponential global agricultural growth, and the Haber-Bosch process is still the benchmark process used today.
I believe the world owes much of what we have agriculturally today to the use of nitrogen that has been produced by the Haber-Bosch process, and whether or not it’s synthetic is, to me at least, irrelevant.
I do believe there is a valid and important argument against the uncontrolled “synthetic” production of chemicals having to do with the garden, but I believe it should be limited to pesticides and herbicides. This is a more complex issue that will take more time to discuss, and we won’t go there at this time.
I do hope that readers of this article are able to understand and appreciate the value and importance of mineral nutrients in helping us grow strong, healthy plants, and that you will not spend your time worrying about “natural” or “synthetic” fertilizers.
Fall Lawn and Vegetable or Flower Garden Preparation
Let’s talk about preparing your lawn, trees, shrubs, and vegetable or flower garden for winter, and how best to improve your soil during this time of year.
Much of this Country seems to be clay soil, so first let’s find out how to improve problem clay soils. These procedures also apply to other types of soil, but may not be so important if you have loamy or sandy soil.
I don’t often dwell on amending your soil, because it is not essential for growing a good garden if you feed and water properly. However, it can be a good idea, so long as you use clean, weed, seed, bug, and disease-free materials.
Weed-free grass clippings are good soil amendments when they’re available IF the homeowner has not used “Weed & Feed” on the lawn, as are finely ground-up pine needles. And this time of the year you can also use your leaves. Mulch pine needles and leaves as fine as possible with a chipper/shredder or mulching mower, and then turn 3 or 4 inches of them into your soil-beds. Just don’t use walnut leaves, as the sap is toxic to your vegetables, especially tomatoes. This procedure will improve your soil tilth, and doing it in the fall gives the organic material plenty of time to de-compose before spring planting.
What else should you be doing now to get your yard ready for winter and give growing things a head start for spring? The Mittleider Method – as taught in his gardening books available at www.growfood.com – teaches the importance of and the best methods of weeding and feeding your garden. A final weeding is a very good idea for starters. Left alone, some weeds will over-winter and come back strong as soon as the snow leaves your ground and before you can get into the garden. That’s why farmers plant winter wheat, and gardeners plant things like garlic – so they have a head start in the spring. Don’t give your weeds that advantage!
The next thing to do is to clean up and remove all organic materials from the garden area! Clean, disease-free plant residue should be turned into the soil along with your leaves, and you should remove everything else, so as not to provide a place for bugs to winter-over.
If you can find a “slow-release” 16-16-16 or similar NPK mix, use that to make a batch of Weekly Feed, and use that to put on perennials in the fall. This way it is available to lawn, plants, and trees as they first stir in late winter and early spring. This is also a good time to apply calcium, which is “the foundation of a good feeding program,” and an essential nutrient almost as important as nitrogen. How is this best done? Calcium does not move very far in the soil, so it’s best to work it into the plants’ root zone in the soil. However, what about the majority of your yard, that doesn’t get turned over every fall?
With lawn, trees, shrubs, vines, and perennials such as raspberries and asparagus, it is usually impractical to dig things up every year like a vegetable garden. Therefore, sometimes the question is asked “Would it be advantageous to aerate first, or use a root feeder or something similar to get Pre-Plant minerals more into the root zone?”
Many people feel this is important, and there may be some advantage to aerating your lawn or around your shrubs and trees before applying your fall slow-release fertilizer and calcium. However Dr. Mittleider says it is not necessary and he doesn’t do it, and we have never aerated our yard and get along just fine. Therefore, I recommend you spread the materials evenly on the soil surface, scratch them in with a rake or hoe, and either water them in thoroughly or, if you have already turned off your outside water for the winter, let the melting snow take them down into the root zone of your plants.
Do these things now and your garden can be a thing of beauty even in the winter!
Simple Mini-Greenhouses for Containers and Soil-Beds – Vegetable gardening, or Organic gardening
It’s not too early to begin preparing for early spring planting (it works for fall planting also)! By covering your containers, which we call Grow-Boxes, or Soil-Beds with “Mini-Greenhouses” using PVC arches and greenhouse plastic, you can be in your vegetable garden with cool-weather plants by the end of February or the first of March, and continue growing into November. They will warm the soil and protect your plants from light frosts. And with a little supplemental heat (small space heater) even hard frosts will not kill your plants. This is often enough to extend your growing season by several weeks in both spring and fall.
This process works great with organic gardens, container gardens, raised-bed gardens, or in plain old soil-beds.
Pictures can be seen in the Photos section of the free MittleiderMethodGardening Group on Yahoo Groups, or the Mittleider Gardening Group on Facebook. Invitations to join are on every page of the Food For Everyone Foundation website at http://www.foodforeveryone.org. The pictures show arches over Grow-Boxes, or containers. Following are instructions for building a jig and then making PVC arches for 18″-wide boxes or soil-beds.
Materials needed:
11 – 5′ lengths of 1/2″ Schedule 40 PVC pipe – to be placed 3′ apart in each bed or box to be covered.
6-mil greenhouse plastic – 5′ wide and 33′ long – one for each bed or box to be covered.
For Grow-Boxes only – 3 10′ lengths of 3/4″ Schedule 200 PVC pipe, cut into 24 15″ pieces for each box to be covered. Plus 22 2″ nails and a small 2″ X 4″ block.
One 30″ X 30″ sheet of plywood, plus 6 – 2 1/2″ nails.
One heat gun (to heat and bend pipe).
With a pen, make 3 marks at the top of the plywood sheet – one in the center, and one each, 9″ to the left and right of the center. Go down 9″ on the plywood and make 3 marks exactly corresponding to the first 3. Draw lines from the outside lower marks to the top center mark. Place marks on both lines 10″ up from the bottom. Go down 27″ from the top of the plywood and make 3 marks corresponding to the others. Draw lines between the 9″ and 27″ marks. Make marks 2″ up from the bottom of both 18″ lines. Drive nails into the 4 upper marks, leaving 2″ of nail exposed. Drive nails into the marks 2″ up from the bottom of the 18″ lines, then drive nails 1″ to the outside of these nails. This is the jig for bending the PVC pipe.
Cut 5′ lengths of 1/2″ schedule 40 PVC pipe. Mark them at 18″ and 28″ from each end. Place one end of PVC pipe between nails on one side, with the end at the 18″ mark (2″ below the first 2 nails). With heat gun, heat PVC pipe at each spot where PVC pipe encounters a nail, and carefully bend the pipe to fit the jig. Allow to cool before removing pipe from jig.
For Grow-Boxes, place 15″ pieces of 3/4″ PVC adjacent to the Grow-Box at each end and at 3′ intervals on both sides. With a hammer, and using the small 2″ X 4″ block of wood, hammer the PVC into the ground until the top is level with the Grow-Box. Drill a hole through the PVC pipe 2″ up from the dirt, and hammer the 2″ nail through both pipe and Grow-Box. Slip the 1/2″ PVC arches into the 3/4″ PVC holding pipes until they encounter the nails – about 6″ deep.
For Soil-Beds, just push the 1/2″ PVC arches into the ground at the peak of the ridge on each side of the Soil-Bed – again about 6″ deep.
Lay the 6-mil plastic over the entire box or bed, centered, with 18″ overhang on each end. Fold excess plastic to avoid a messy appearance. Place dirt on both sides and the ends of the plastic to hold it in place.
Whenever the weather is above 50 degrees, open the ends, and when it is above 65 degrees, lift the plastic from one side and lay it in the aisle.
You must watch carefully to ensure that it doesn’t get too hot in your mini-greenhouses. A thermometer in at least one bed is a good idea, in order to measure the temperature and make necessary adjustments. Note also that brassica’s (cabbage, cauliflower, etc.) can grow in cooler weather than the warm-weather plants. Tomatoes, corn, peppers, etc. must be near 70 degrees or above to do well.
Container Vegetable Gardening – Size, Soil Materials, and Recommended Fertilizers
First off, you must have full sunlight and adequate water to have a successful vegetable garden, so find an all-day sunny spot with a good source of clean (not necessarily drinkable) water before you do anything else.
The next issue you’ll face is the details of how to build, level, fill and fertilize your containers.
Opinions differ widely regarding the answers to the following key questions about creating a container garden. The right answers, if followed, will go a long way toward assuring your success in growing a bumper crop of healthy and tasty vegetables.
1. Should top-soil be used, either by itself or mixed with other materials? 2. Should manure and compost be used for the planting medium or soil-mix? 3. What is the best ratio of materials to use for a container vegetable garden? 4. Is it important to use organic fertilizers in addition to the soil mix? 5. What size is best, in order to maximize yield in the minimum amount of space? 6. How deep does the container need to be to provide adequate space for roots?
- First of all, top soil is NOT recommended for use in containers, because it 1) is heavy, 2) is difficult to work with, 3) does not drain as well as other options, and 4) often contains one or more of the 3 “baddies” – disease, weed seeds, and bugs.
- Every gardener should also consider the following three issues very carefully before using manure and compost in containers, raised-beds, or any other type of vegetable garden, especially as the only or even the main ingredients in the soil-mix.
- As much as 95% of the composted materials available to the typical family gardener have NOT been sterilized, or even heat-treated in the composting process. And yet in order to have clean materials they must have been composted at 140 degrees or more for about 3 weeks, which is the time it takes to thoroughly compost organic materials aerobically, and that’s the only sure way to remove diseases, weed seeds, and bugs.
- In addition to the great potential for problems with disease, weed seeds and bugs, using manure and compost, even just for fertilizer, leaves you guessing as to what nutrition you are giving your plants. You never see the list of plant nutrients or their percentages on a bag of manure or compost, because no-one KNOWS what they are.
- And the third reason you need to be cautious about using manure/compost is that using them can often lead to a salinity problem and burn your plants. For example, applying 2″-3″ of manure to the planting area of a soil-bed or container adds 10#-15# of fertilizer salts all at once to the soil in a 30′-long bed or box. That’s more salt than the soil should have in an entire growing season! Imagine the effect of applying that much manure to the entire garden or worse yet, making it 25-50% of the entire soil mix, both of which are often done by enthusiastic organic gardeners!
3. Rather than using manure and/or compost in your container garden you will be wise to use two or more CLEAN ingredients for your soil-mix, including 30 to 35% sand (by volume) mixed with any combination of the following – sawdust, perlite, peat moss, ground-up pine needles, coconut husks, coffee hulls, rice hulls, or vermiculite – depending on cost and availability.
4. Plants cannot “eat” or even use animal excrement or compost. Both must fully decompose and their organic parts must revert to water-soluble inorganic minerals before plants can access them. Plants need small, measured and balanced amounts of 13 natural mineral nutrients dissolved in water and absorbed through the root hairs over the entire course of their growing cycle, rather than a large application of salts at one time.
For real success in your garden you must give your plants exactly what they need for sustained healthy growth. I recommend applying only about 7 OUNCES of mineral salts per week to a 30 foot-long bed or box, which is the amount applied weekly in a Mittleider garden.
Get the Mittleider Gardening Course book at www.growfood.com/shop to discover how to do it yourself – instructions and natural mineral formulas are all there.
5. Now briefly, let’s discuss ideal sizes for your containers. Any length is fine, depending on available space. But the width of both the container and aisles is important. You do not want to waste precious space in your garden, but plants need light and air, so the ideal width is beds of either 18″ or 4′, and aisles of at least 3′, and preferably 3 1/2′. Here’s why:
An 18′ width allows two rows of most plants, with room for light and air, plus feeding, watering, weeding, and harvesting between the rows. And a 4′-wide bed allows 4 rows of most plants or 2 rows of very large or climbing plants. Details on growing vertically are the subject for another article, but suffice it to say that you can at least double or triple your yields by growing vertically.
6. And you only need container frames 8″ high. If possible it’s good to set them on existing soil, so your plants’ roots can go into the native soil and get additional nutrients, but it’s not necessary. You can even grow healthy plants on a driveway, deck, or even a flat roof! Remember you’re feeding them everything they need with the natural mineral nutrients.
Good Growing!