About
Shop
FAQ
Freebies
Gallery
Simple Mini-Greenhouses for Containers and Soil-Beds – Vegetable gardening, or Organic gardening
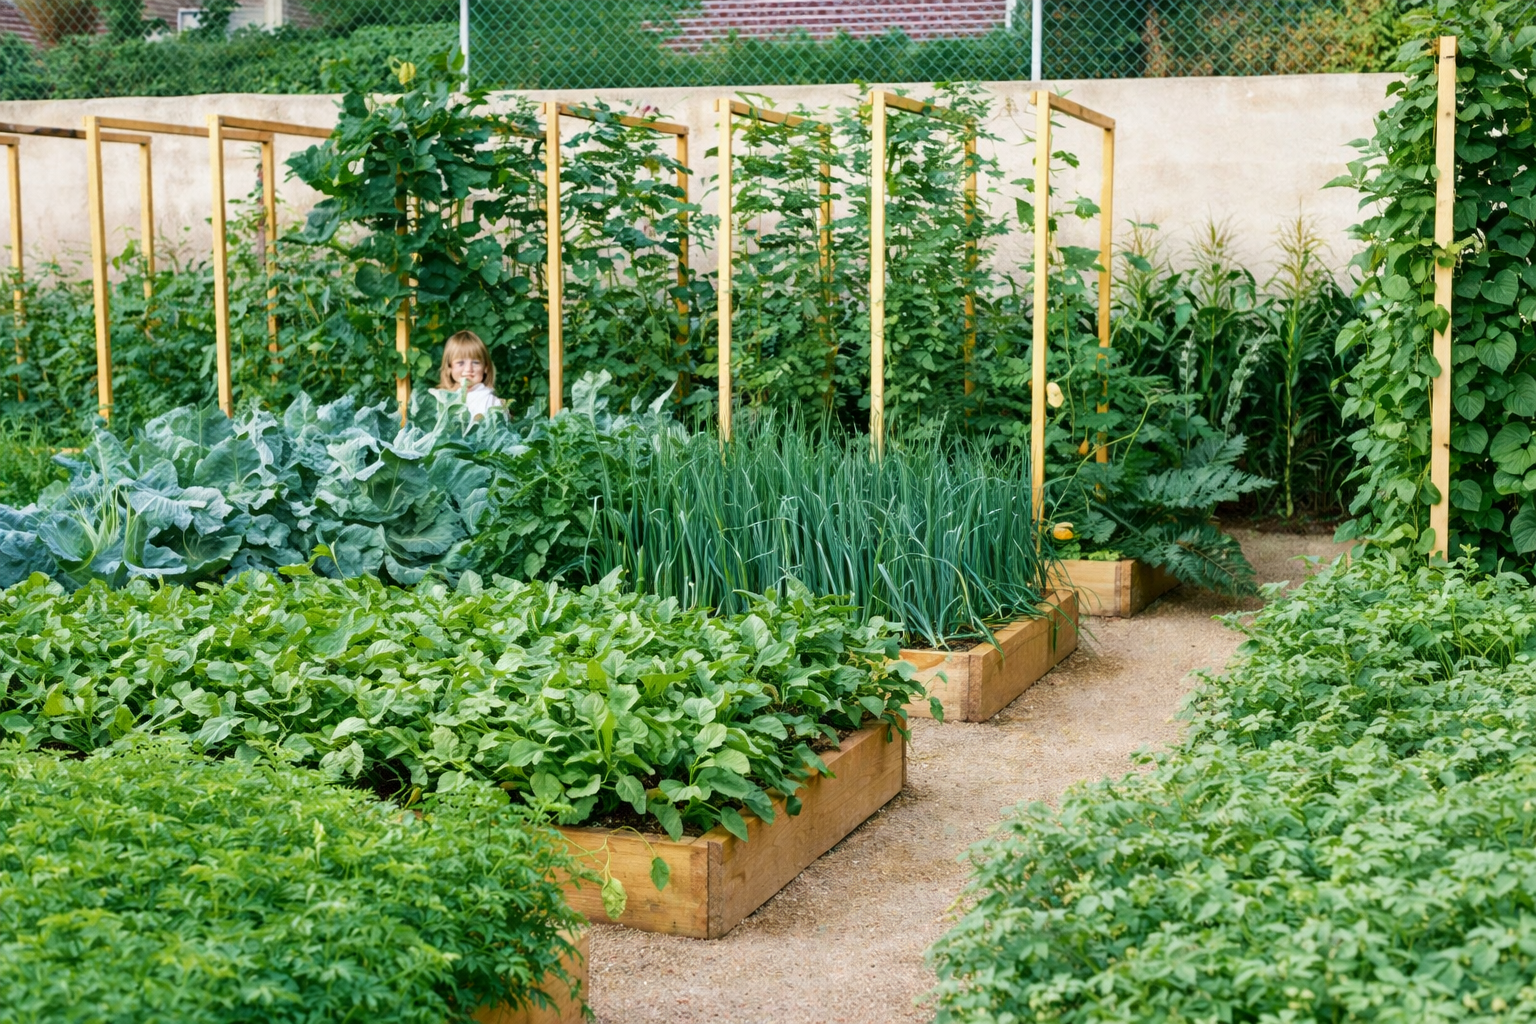
It’s not too early to begin preparing for early spring planting (it works for fall planting also)! By covering your containers, which we call Grow-Boxes, or Soil-Beds with “Mini-Greenhouses” using PVC arches and greenhouse plastic, you can be in your vegetable garden with cool-weather plants by the end of February or the first of March, and continue growing into November. They will warm the soil and protect your plants from light frosts. And with a little supplemental heat (small space heater) even hard frosts will not kill your plants. This is often enough to extend your growing season by several weeks in both spring and fall.
This process works great with organic gardens, container gardens, raised-bed gardens, or in plain old soil-beds.
Pictures can be seen in the Photos section of the free MittleiderMethodGardening Group on Yahoo Groups, or the Mittleider Gardening Group on Facebook. Invitations to join are on every page of the Food For Everyone Foundation website at http://www.foodforeveryone.org. The pictures show arches over Grow-Boxes, or containers. Following are instructions for building a jig and then making PVC arches for 18″-wide boxes or soil-beds.
Materials needed:
11 – 5′ lengths of 1/2″ Schedule 40 PVC pipe – to be placed 3′ apart in each bed or box to be covered.
6-mil greenhouse plastic – 5′ wide and 33′ long – one for each bed or box to be covered.
For Grow-Boxes only – 3 10′ lengths of 3/4″ Schedule 200 PVC pipe, cut into 24 15″ pieces for each box to be covered. Plus 22 2″ nails and a small 2″ X 4″ block.
One 30″ X 30″ sheet of plywood, plus 6 – 2 1/2″ nails.
One heat gun (to heat and bend pipe).
With a pen, make 3 marks at the top of the plywood sheet – one in the center, and one each, 9″ to the left and right of the center. Go down 9″ on the plywood and make 3 marks exactly corresponding to the first 3. Draw lines from the outside lower marks to the top center mark. Place marks on both lines 10″ up from the bottom. Go down 27″ from the top of the plywood and make 3 marks corresponding to the others. Draw lines between the 9″ and 27″ marks. Make marks 2″ up from the bottom of both 18″ lines. Drive nails into the 4 upper marks, leaving 2″ of nail exposed. Drive nails into the marks 2″ up from the bottom of the 18″ lines, then drive nails 1″ to the outside of these nails. This is the jig for bending the PVC pipe.
Cut 5′ lengths of 1/2″ schedule 40 PVC pipe. Mark them at 18″ and 28″ from each end. Place one end of PVC pipe between nails on one side, with the end at the 18″ mark (2″ below the first 2 nails). With heat gun, heat PVC pipe at each spot where PVC pipe encounters a nail, and carefully bend the pipe to fit the jig. Allow to cool before removing pipe from jig.
For Grow-Boxes, place 15″ pieces of 3/4″ PVC adjacent to the Grow-Box at each end and at 3′ intervals on both sides. With a hammer, and using the small 2″ X 4″ block of wood, hammer the PVC into the ground until the top is level with the Grow-Box. Drill a hole through the PVC pipe 2″ up from the dirt, and hammer the 2″ nail through both pipe and Grow-Box. Slip the 1/2″ PVC arches into the 3/4″ PVC holding pipes until they encounter the nails – about 6″ deep.
For Soil-Beds, just push the 1/2″ PVC arches into the ground at the peak of the ridge on each side of the Soil-Bed – again about 6″ deep.
Lay the 6-mil plastic over the entire box or bed, centered, with 18″ overhang on each end. Fold excess plastic to avoid a messy appearance. Place dirt on both sides and the ends of the plastic to hold it in place.
Whenever the weather is above 50 degrees, open the ends, and when it is above 65 degrees, lift the plastic from one side and lay it in the aisle.
You must watch carefully to ensure that it doesn’t get too hot in your mini-greenhouses. A thermometer in at least one bed is a good idea, in order to measure the temperature and make necessary adjustments. Note also that brassica’s (cabbage, cauliflower, etc.) can grow in cooler weather than the warm-weather plants. Tomatoes, corn, peppers, etc. must be near 70 degrees or above to do well.
Lots of Blossoms But Not Much Fruit – What’s Happening?
Following is a seemingly simple question, the answer to which is very important to having a successful garden. To answer it properly is not so simple, but it is worth knowing, so I invite you to pay close attention to each element of my response.
Q. I have hundreds of blossoms on my tomato, squash and etc. plants yet very little fruit. I have observed that there are no bees around. Is this normal? What can I do to correct this situation?
A. The lack of pollinators is rarely a problem for tomatoes because their blossoms are “perfect”, meaning they contain both male and female parts. Even a gentle breeze or movement of the plant stems will allow pollination to occur.
Squash can be pollinated by hand quite easily, so long as you can find both male and female blossoms . You must take a male blossom – which is the one WITHOUT a small fruit forming behind the flower – strip the petals off, then touch the tip, or stamen, to the pistil, or tip of the female blossom. One male can pollinate several females if necessary.
This must be done in the early morning, when both blossoms are fully open, or the female won’t be receptive to pollination.
Next let’s consider the bee situation. Many places in the country are currently experiencing a severe shortage of bees. Diseases have ravaged many thousands of hives, and this is a good part of the reason honey is SO expensive lately.
First off, don’t use pesticides in your garden. They will very often kill the beneficial insects along with the problem ones. If you MUST spray a pesticide do it in the heat of mid-day when there is little or no wind. This is when bees and other pollinators are least active. And use the least toxic product possible that will accomplish your objective.
Attracting pollinators to your garden may be more difficult than just pollinating the squash yourself. Some people even resort to buying a beehive and placing it near their garden.
Many people also plant flowers near their gardens in hopes of attracting bees, etc. For maximum effectiveness you need to plant them in several bunches, rather than single flowers here and there. Flower colors that particularly attract bees include blue, purple, violet, white, and yellow.
Native plants are said to be much more attractive to native bees than exotic flowers. They are also well adapted to local growing conditions and require minimum attention.
Again, for maximum effectiveness, include several plant species that flower at the same time – to increase the number of bee species attracted to your garden – and plant a sequence of plants flowering through spring, summer, and fall, so that you attract a range of bee species that fly during different times of the growing season.
Another factor that could account for having very little fruit on plants is the temperature. This question was asked during the first week of August, which is usually the hottest time of the year.
Extreme heat is often the cause of plants not being able to set fruit. They like temperatures below 90 degrees Fahrenheit, and when it’s above 95 there is very little fruit-set.
Also, unless night-time temperatures are at least 15 degrees lower than daytime temperatures some plants won’t set fruit.
To mitigate the heat problem consider applying partial shade to your plants during the few hottest hours of the day. This is best done by placing a 25%-35% shade cloth directly above the plants, such that it shades only during the hours from 11 A.M. to 3 P.M.
Little-Known Tips & Techniques for Growing a Highly Successful Garden Anywhere
I’m often asked by people how they can maximize the use of the limited space they have for a vegetable garden. Many urban dwellers only have a couple of hundred square feet of ground that’s sunny enough to grow a successful garden. Others, in the suburbs or in more rural settings, might have as much as 5,000 to 10,000 square feet. Those folks can actually feed their families from their gardens using the tips I’ll give you.
I will describe the steps to a highly successful gardening experience in a garden of 1,000 square feet. These tips and techniques are the secrets to give you a great garden in any soil, and in virtually any climate.
A 1,000 square foot garden can grow a tremendous amount of produce if you do it properly (how about 5,000# of tomatoes)! If left alone, or done haphazardly, however, it will be a big disappointment, and you will grow weeds instead, so following the recipe is critically important.
Most people seem to be “afflicted” with clay soil, and believe they cannot grow successfully without substantial time, effort, and money spent in amending it. Clay soil is NOT a problem, and NO soil amendments are needed if you will create slightly raised, level, ridged beds as described in the free e-book at https://growfood.com/freebies/ . And be sure to use the lime and other natural mineral nutrients as instructed!
Lay out and stake your garden with 18″ soil-beds, and aisles at least 3′ wide. Use 4 – 2″ X 2″ X 18″ PAINTED stakes per soil-bed. Depending on your dimensions you can have 11 – 20′-long beds with 3′-wide aisles. I’ll use that shape for my example.
Another common mistake family gardeners often make is planting too much of the single-crop vegetables, such as lettuce, cabbage, cauliflower, etc.
I would only plant a small amount – say 1/4 bed of each of these things at most – for the following reason. Single-crop plants mature all at once. This means that even with only 5′ rows of each you will have 20 heads of lettuce, 10 heads each of cabbage, cauliflower, and broccoli all maturing at virtually the same time, and THEY’LL ALL NEED TO BE PICKED AT THE SAME TIME. Otherwise they get bad, and they attract both bugs and diseases.
Whenever you plant single-crop vegetables, plant only what you can use, give away, sell, or store in the 1-2 week ideal harvesting window. If you want them all season you MUST do several small plantings – spaced at 2-3 week intervals.
Here’s an important tip to greatly reduce the problem of these crops all maturing at once, and increase your yields from these, as well as others, such as kale, Swiss Chard, carrots, celery, etc. As soon as the leaves are big enough, begin removing one or two outer leaves each week, and eating them. We have eaten fresh, sweet, green celery stalks for almost 9 months!
In order to get the most from your gardening efforts and limited space, I recommend growing EVERBEARING crops like tomatoes, cucumbers, pole beans, peppers, eggplant, melons and squash. They are often considered the highest-value crops. And I recommend you grow everything vertically using T-Frames! This is a BIG secret to multiplying your yields AND reducing your losses to diseases and pests.
Start your garden by being certain that it’s totally weed free, including 4-5′ on all sides at the time of planting. Then use a 2-way (also called a shuffle or hula) hoe to quickly and easily weed again about a week after planting, or as soon as the weeds begin to show their faces. NEVER WAIT for the weeds to grow bigger! They’re most vulnerable when they are tiny, and they are very easy to eliminate. You might have to do this two or three times, but then you will have a healthy, weed-free garden all season long. Having a weed-free garden will also reduce your problems with bugs and diseases!
Rather than planting everything by seed directly in your garden soil, I highly recommend growing seedlings in a mixture of sawdust and sand – in a 2 to 1 ratio – using plastic or wooden trays, as the best way to start many varieties of plants. You can extend your growing season by several weeks by transplanting healthy seedlings of almost all large plants. They will grow faster and will be healthier in a protected environment than what you grow in the ground from seed. The seedlings must have constant sunlight to thrive, however, just as if they were in the garden. Growing seedlings is very rewarding, and is a simple process, but again you MUST follow the steps accurately and consistently.
You can very quickly and easily learn to become competent at growing your own seedlings by reading Lesson 22 of The Mittleider Gardening Course book – www.growfood.com/shop.
If you decide to grow directly from seeds in the ground, make sure your seed-bed is soft and smooth. Scratch a SHALLOW furrow on both sides of the bed near the ridges. For very small seeds mix seeds with sand in a 1 to 100 ratio, and sprinkle carefully the length of the row, as evenly as possible. Then cover the seeds WITH SAND rather than the clay soil (this goes for ALL seeds), and less than 1/8th inch deep. Meanwhile, remember that only ONE OUNCE of small seeds like tomato seeds includes TEN THOUSAND SEEDS, so don’t plant too many!
For every crop in your garden you can learn everything you need to know about when, where, how far apart, and how deep to plant, plus 10 more critically important pieces of the gardening puzzle, simply by using The Garden Planting Details Schedule, in Appendix B of The Mittleider Gardening Course book. That Schedule is priceless, and should be in the garden with you every day!
Which crops you should plant depends on the temperatures in your growing area. Most places cannot grow warm-weather crops like tomatoes, peppers, beans, melons, and squash in the winter months. Wait to transplant those into the garden until daytime temperatures are 65-70 and night-time temperatures are 50 or above.
Cool-weather crops like cauliflower, broccoli, spinach, beets, lettuce, and the like, can be planted when it’s colder, but don’t plant if you have frosts at night, and remember that even these hardy plants need daytime temperatures above 50 degrees fahrenheit to grow.
Some people like to minimize the chore of weeding by putting black plastic everywhere. Using black plastic is generally NOT a good idea when planting seeds. The open space needed for seeds to emerge and grow successfully leaves room for weeds to grow as well. And weeds from all around the opening will find it and choke out your tiny vegetable seedlings as they emerge. Meanwhile, the plastic makes it very difficult to weed thoroughly and successfully.
Black plastic can be used successfully when growing seedlings, but it is not a cure-all, and it is less desirable than leaving the ground bare and weeding properly.
Proper and timely watering is essential to a successful garden. Sometimes people think they can save time by sprinkling everything, or by leaving soaker hoses on while they do other things. Soaker hoses are less than ideal for several reasons: First, the holes are easily plugged; second, weeding around the hose is difficult; third, the hose is easily cut when attempting to weed around it, and fourth, water quantity is uncertain and often inadequate.
You should never sprinkle a vegetable garden. It is terribly wasteful of water, it waters the ridges and aisles, encouraging weed growth, and it increases diseases and pest problems.
The best and easiest watering method I know is the semi-automated method taught in chapter 16 of the Mittleider Gardening Course book. This uses 3/4″ Schedule 200 PVC pipe, drilled with 3 #57 holes every 4″, with the pipe running down the center of the soil-bed and lifted off the soil about 2″ by small 2 X 4″ wooden blocks. Water is controlled by an inexpensive ball valve placed at the head of each row, and the whole garden is plumbed together for fast, accurate, and highly efficient watering.
If you can’t or don’t want to automate your watering, simply attach a large old towel around the end of your garden hose, then place the hose in the soil-bed. If your beds are level, as they should be, the entire soil-bed will quickly receive the needed 1″ of water. And whichever method you use, remember to water daily – especially in warm weather – unless it rains. Whether your watering is automated or manual, watering only the root zone of the plants will save you more than 1/2 the water you’d use with traditional methods.
Finally, feed your plants the 13 natural mineral nutrients they must have for healthy growth. And provide those nutrients regularly throughout the growth cycle to maximize your yields of tasty, healthy fruits and vegetables. The free ebook on the Foundation’s website gives complete instructions for fertilizing your garden.
Propagating Can Be Simple, Productive, and Fun
Have you ever wished you could grow sweet, fresh pineapples like those great Del Monte ones you can sometimes find in the stores? How about bananas or other tropical delights – wouldn’t it be fun to grow your own, right in your back yard?
There are certainly some limitations, but not as severe as most people think. Let me give you a few ideas to get your imagination going:
Traditionally, pineapple is grown from cuttings from old growth. The crown or growing tip is left in the field until it dries out, then it’s harvested and stuck in newly prepared soil to grow again. This method requires 18-24 months to produce new fruit from the old material.
How about trying a different approach, which you can do with the pineapple you buy at your local store? Just break off the top and prepare it for immediate planting in your greenhouse or other warm space with ample sunlight. Here’s how:
With your fingers, take off the green fronds nearest the broken end for about one inch (2 1/2 cm), leaving the stalk exposed. Place in a 4″ pot or tray of pre-moistened sawdust/sand mixture that has been prepared for planting seedlings, with Pre-Plant and Weekly Feed mixes included at 1 1/2 ounces and 3/4 ounces per 1/2 cubic foot of soil.
Water regularly to maintain soil moisture with clean water until roots appear, then use the constant feed solution of 1 ounce Weekly Feed for 3 gallons of water for every watering until plants are placed in the garden – about 4-8 weeks, depending on your growing conditions inside and in your garden. You should have a strong, healthy root structure by the time they are planted into the garden.
Transplant into the garden only after all danger of frost is past and the soil is warm. Apply Pre-Plant and Weekly Feed to the soil before transplanting into the garden. Feed weekly with Weekly Feed until 8 weeks before harvest.
If nights get cold before the plants reach maturity, cover them with greenhouse plastic using the “mini-greenhouse” frames shown in the Mittleider gardening books and the Photo section of the MittleiderMethodGardening group on Yahoo Groups, or the Mittleider Gardening Group on Facebook. Apply heat as needed to avoid any possibility of frost, and keep the plants from going dormant.
This simple process changes the time needed to grow mature pineapples from 18+ months to 8 months! Sweet potatoes’ growing times can be reduced from 10 1/2 months to 6 months or less, and other crops see similar improvement.
With those numbers, I hope some of you – especially in the warmer climates – will have the courage to try your hand at propagating plants. It can be both fun and rewarding.
Just remember that these plants are grown in the tropics for a reason, and make sure they have ample heat and sunlight, along with plenty of water. And always start with healthy propagation stock! Never expect or even hope to get healthy seedlings from diseased or weak plant materials.
What about propagating the plants in your traditional vegetable garden? Most vegetables mature so fast that propagating isn’t very practical. However, some folks like to propagate new plants from their tomatoes, and that’s easy to do by removing the sucker stems – gently to avoid bruising the root hairs that grow along the stem – and placing the stem in a tray or pot as described above. The problem with doing this is that the new plants will be substantially behind the parent plants, so unless you were planning on a later planting anyway, don’t bother.
Remember that tomato plants that are fed and cared for will continue to produce for more than a year if there is no frost, so you don’t need to plant a new set of plants for a second crop.
Budding and grafting trees is also very interesting, and can help you improve your orchards, however that article needs more space than we have here, and will have to wait for another day.
Enjoy!