About
Shop
FAQ
Freebies
Gallery
Prepare Now For Next Spring’s Garden
Winter’s the time to get ready to grow your own seedlings! It’s not really difficult, and can extend your growing season by many weeks. For example, by planting cabbage, broccoli, and cauliflower in February in your basement under grow-lights, you can put large, sturdy transplants into your garden by the end of March or early April, and be eating them when others are just seeing them come up!
Remember that photosynthesis, using light, heat and moisture causes plant growth. Therefore you must follow a few key natural principles very carefully, or you will be disappointed.
First, seeds must have moisture to germinate and grow. And the soil mix must be moist, but not soggy, or you’ll drown the new plant, since it must also have oxygen!
Second, while heat is essential, temperatures must be maintained in a narrow range for ideal germination to occur. Most vegetable seeds germinate quickly between 75 and 80 degrees Fahrenheit. After plants are up, many of them will grow in cooler temperatures, but most all will become dormant (stop growing) at temperatures below 50 degrees.
Third, light is not necessary for seed germination, but as soon as your seedlings begin to emerge from the soil, maximum light is required immediately for proper development. Therefore, to grow in your house, make sure your plants have a strong (but not hot!) light source directly on the plants, for up to 16 hours per day. Note the pictures of two grow-light shelves in the Gallery Section. The metal one is 6-shelf Commercial Chrome Shelving, from Sam’s Club costing only $70, and will hold 20 flats of plants. Suspend shop lights with 2 cool and 2 warm 40-watt tubes 4 to 6″ above the plants, or use more efficient LED grow-lights .
The fourth principle relates to feeding. A balanced nutrient mix of 13 minerals is essential to plants immediately after germination. Those nutrients are mineral salts and must be very dilute in the soil moisture, otherwise osmosis will cause the salt to draw the life-giving moisture out of the plants, and they will die. To ensure you never burn your plants, water seedlings daily using the “Constant Feed Solution” of one scant ounce (2 almost level tablespoons) of Weekly Feed dissolved in 3 gallons of water. To make the Weekly Feed Mix simply add one small packet of the Micro-Mix, which is available on the Foundation’s website listed below, with 4# of Epsom Salt and 25# of 16-16-16.
Next, it is important to separate your small plants before their leaves begin to overlap with others’, or the tiny stems will become very weak and spindly as the plants all stretch – looking for more light. By the time the plants have their first or second true leaf this step should be completed. Failure to act for even a few hours can result in spindly, weak plants, which sometimes never recover. Transplanting seedlings into 2″ 6-paks or pots will provide adequate space for them to grow an additional 2-3 weeks, depending on variety. If it’s still too early to put them out into the garden by the time plant leaves are again beginning to overlap, prune the leaves, transplant again into larger pots, or separate pots, so the plant leaves always have maximum light.
Before transplanting into the garden, “harden-off” your plants outside, off the ground for 2 to3 days, to acclimate them to direct sunlight, temperature, wind, etc. This is important so the plant doesn’t have the shock of a new environment added to the shock to its root system caused by transplanting. If the weather turns cold at night, bring the plants back in the house. The temperature adjustment needs to be gradual.
For many of your plants, the pruning process does double duty. In addition to assuring maximum light, it shocks the plant mildly, causing it to pause in its growth and produce a thicker, sturdier stem. This process makes the plant much better able to endure the vicissitudes of the outside environment, such as cutworms, ants, etc. that often quickly decimate plants with weak, spindly stems.
For tall-growing plants, like tomatoes, be sure to provide small stakes tied to the plant stem, to prevent them from falling over. And with tomatoes, begin immediately to remove all sucker stems as soon as possible, to assure a single, strong stem and maximum production from your plant.
Great growing instructions can be found in the book Let’s Grow Tomatoes, available as a digital download and as a part of the Mittleider Gardening Library CD. It’s available at www.growfood.com/shop.
Little-Known Tips & Techniques for Growing a Highly Successful Garden Anywhere
I’m often asked by people how they can maximize the use of the limited space they have for a vegetable garden. Many urban dwellers only have a couple of hundred square feet of ground that’s sunny enough to grow a successful garden. Others, in the suburbs or in more rural settings, might have as much as 5,000 to 10,000 square feet. Those folks can actually feed their families from their gardens using the tips I’ll give you.
I will describe the steps to a highly successful gardening experience in a garden of 1,000 square feet. These tips and techniques are the secrets to give you a great garden in any soil, and in virtually any climate.
A 1,000 square foot garden can grow a tremendous amount of produce if you do it properly (how about 5,000# of tomatoes)! If left alone, or done haphazardly, however, it will be a big disappointment, and you will grow weeds instead, so following the recipe is critically important.
Most people seem to be “afflicted” with clay soil, and believe they cannot grow successfully without substantial time, effort, and money spent in amending it. Clay soil is NOT a problem, and NO soil amendments are needed if you will create slightly raised, level, ridged beds as described in the free e-book at https://growfood.com/freebies/ . And be sure to use the lime and other natural mineral nutrients as instructed!
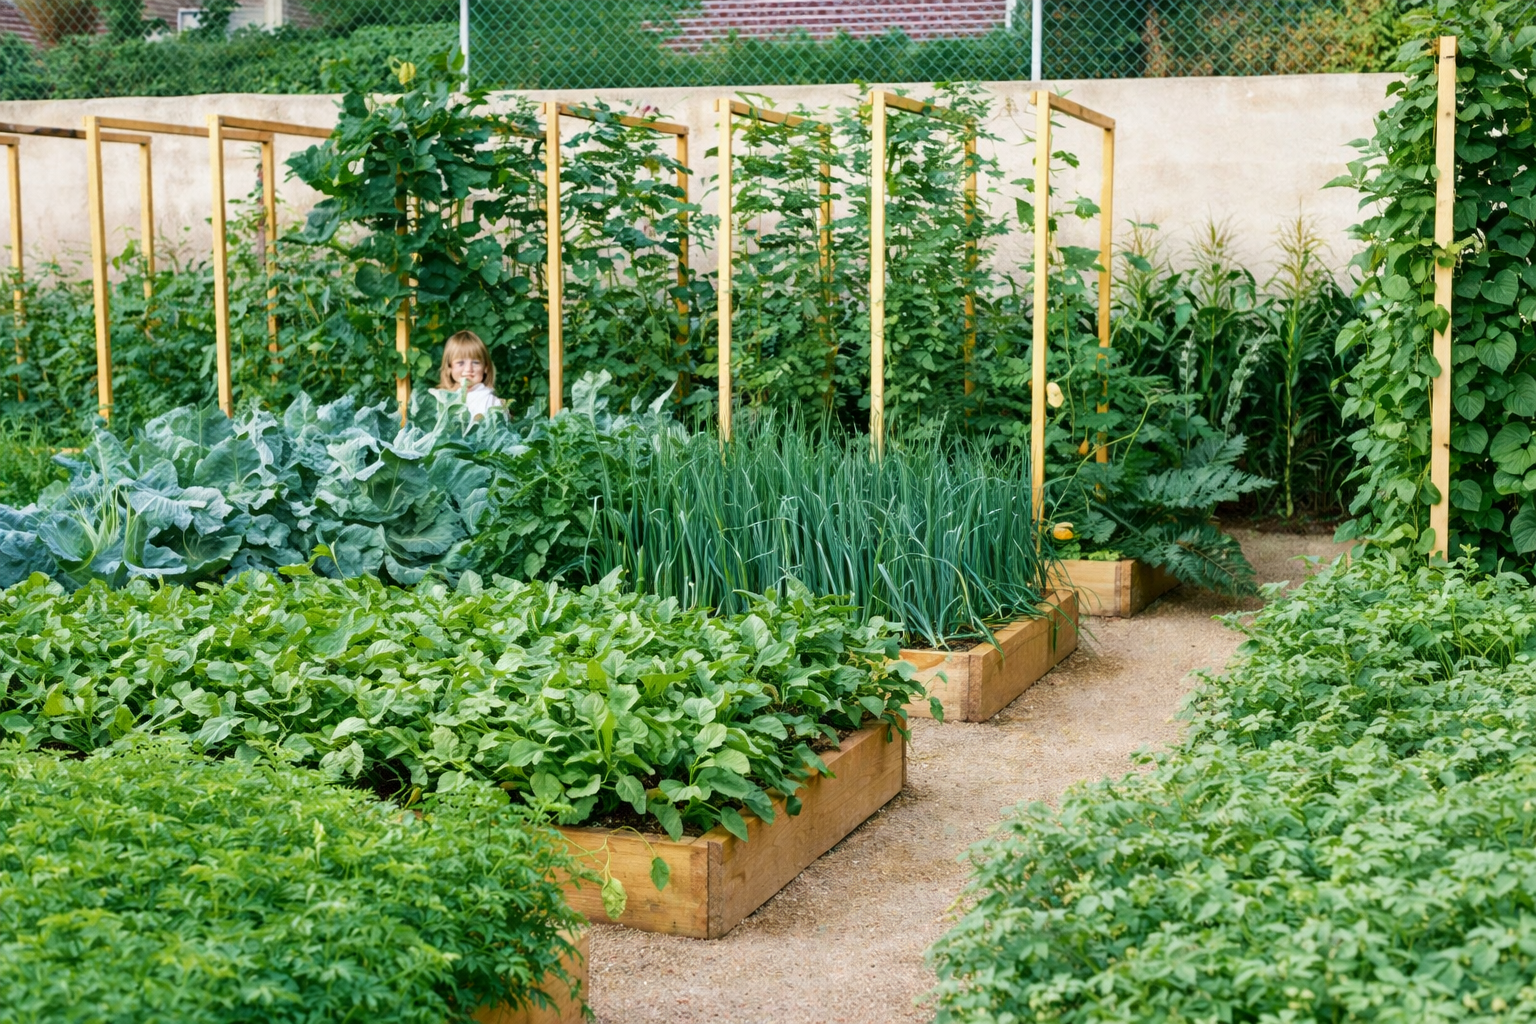
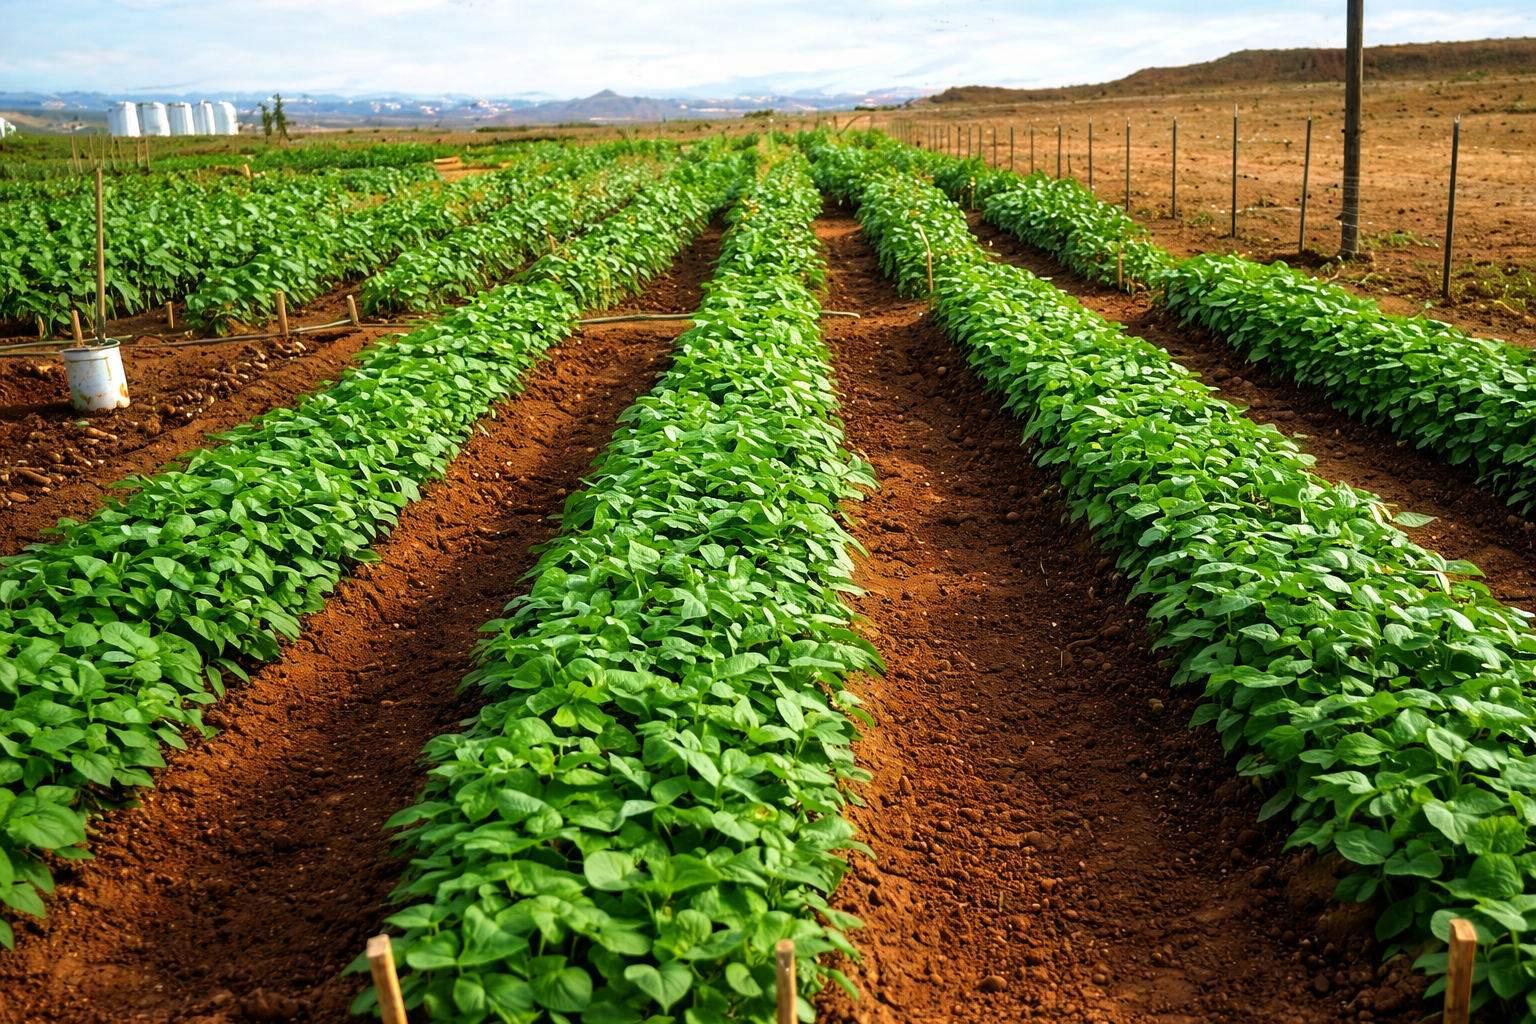
Lay out and stake your garden with 18″ soil-beds, and aisles at least 3′ wide. Use 4 – 2″ X 2″ X 18″ PAINTED stakes per soil-bed. Depending on your dimensions you can have 11 – 20′-long beds with 3′-wide aisles. I’ll use that shape for my example.
Another common mistake family gardeners often make is planting too much of the single-crop vegetables, such as lettuce, cabbage, cauliflower, etc.
I would only plant a small amount – say 1/4 bed of each of these things at most – for the following reason. Single-crop plants mature all at once. This means that even with only 5′ rows of each you will have 20 heads of lettuce, 10 heads each of cabbage, cauliflower, and broccoli all maturing at virtually the same time, and THEY’LL ALL NEED TO BE PICKED AT THE SAME TIME. Otherwise they get bad, and they attract both bugs and diseases.
Whenever you plant single-crop vegetables, plant only what you can use, give away, sell, or store in the 1-2 week ideal harvesting window. If you want them all season you MUST do several small plantings – spaced at 2-3 week intervals.
Here’s an important tip to greatly reduce the problem of these crops all maturing at once, and increase your yields from these, as well as others, such as kale, Swiss Chard, carrots, celery, etc. As soon as the leaves are big enough, begin removing one or two outer leaves each week, and eating them. We have eaten fresh, sweet, green celery stalks for almost 9 months!
In order to get the most from your gardening efforts and limited space, I recommend growing EVERBEARING crops like tomatoes, cucumbers, pole beans, peppers, eggplant, melons and squash. They are often considered the highest-value crops. And I recommend you grow everything vertically using T-Frames! This is a BIG secret to multiplying your yields AND reducing your losses to diseases and pests.
Start your garden by being certain that it’s totally weed free, including 4-5′ on all sides at the time of planting. Then use a 2-way (also called a shuffle or hula) hoe to quickly and easily weed again about a week after planting, or as soon as the weeds begin to show their faces. NEVER WAIT for the weeds to grow bigger! They’re most vulnerable when they are tiny, and they are very easy to eliminate. You might have to do this two or three times, but then you will have a healthy, weed-free garden all season long. Having a weed-free garden will also reduce your problems with bugs and diseases!
Rather than planting everything by seed directly in your garden soil, I highly recommend growing seedlings in a mixture of sawdust and sand – in a 2 to 1 ratio – using plastic or wooden trays, as the best way to start many varieties of plants. You can extend your growing season by several weeks by transplanting healthy seedlings of almost all large plants. They will grow faster and will be healthier in a protected environment than what you grow in the ground from seed. The seedlings must have constant sunlight to thrive, however, just as if they were in the garden. Growing seedlings is very rewarding, and is a simple process, but again you MUST follow the steps accurately and consistently.
You can very quickly and easily learn to become competent at growing your own seedlings by reading Lesson 22 of The Mittleider Gardening Course book – www.growfood.com/shop.
If you decide to grow directly from seeds in the ground, make sure your seed-bed is soft and smooth. Scratch a SHALLOW furrow on both sides of the bed near the ridges. For very small seeds mix seeds with sand in a 1 to 100 ratio, and sprinkle carefully the length of the row, as evenly as possible. Then cover the seeds WITH SAND rather than the clay soil (this goes for ALL seeds), and less than 1/8th inch deep. Meanwhile, remember that only ONE OUNCE of small seeds like tomato seeds includes TEN THOUSAND SEEDS, so don’t plant too many!
For every crop in your garden you can learn everything you need to know about when, where, how far apart, and how deep to plant, plus 10 more critically important pieces of the gardening puzzle, simply by using The Garden Planting Details Schedule, in Appendix B of The Mittleider Gardening Course book. That Schedule is priceless, and should be in the garden with you every day!
Which crops you should plant depends on the temperatures in your growing area. Most places cannot grow warm-weather crops like tomatoes, peppers, beans, melons, and squash in the winter months. Wait to transplant those into the garden until daytime temperatures are 65-70 and night-time temperatures are 50 or above.
Cool-weather crops like cauliflower, broccoli, spinach, beets, lettuce, and the like, can be planted when it’s colder, but don’t plant if you have frosts at night, and remember that even these hardy plants need daytime temperatures above 50 degrees fahrenheit to grow.
Some people like to minimize the chore of weeding by putting black plastic everywhere. Using black plastic is generally NOT a good idea when planting seeds. The open space needed for seeds to emerge and grow successfully leaves room for weeds to grow as well. And weeds from all around the opening will find it and choke out your tiny vegetable seedlings as they emerge. Meanwhile, the plastic makes it very difficult to weed thoroughly and successfully.
Black plastic can be used successfully when growing seedlings, but it is not a cure-all, and it is less desirable than leaving the ground bare and weeding properly.
Proper and timely watering is essential to a successful garden. Sometimes people think they can save time by sprinkling everything, or by leaving soaker hoses on while they do other things. Soaker hoses are less than ideal for several reasons: First, the holes are easily plugged; second, weeding around the hose is difficult; third, the hose is easily cut when attempting to weed around it, and fourth, water quantity is uncertain and often inadequate.
You should never sprinkle a vegetable garden. It is terribly wasteful of water, it waters the ridges and aisles, encouraging weed growth, and it increases diseases and pest problems.
The best and easiest watering method I know is the semi-automated method taught in chapter 16 of the Mittleider Gardening Course book. This uses 3/4″ Schedule 200 PVC pipe, drilled with 3 #57 holes every 4″, with the pipe running down the center of the soil-bed and lifted off the soil about 2″ by small 2 X 4″ wooden blocks. Water is controlled by an inexpensive ball valve placed at the head of each row, and the whole garden is plumbed together for fast, accurate, and highly efficient watering.
If you can’t or don’t want to automate your watering, simply attach a large old towel around the end of your garden hose, then place the hose in the soil-bed. If your beds are level, as they should be, the entire soil-bed will quickly receive the needed 1″ of water. And whichever method you use, remember to water daily – especially in warm weather – unless it rains. Whether your watering is automated or manual, watering only the root zone of the plants will save you more than 1/2 the water you’d use with traditional methods.
Finally, feed your plants the 13 natural mineral nutrients they must have for healthy growth. And provide those nutrients regularly throughout the growth cycle to maximize your yields of tasty, healthy fruits and vegetables. The free ebook on the Foundation’s website gives complete instructions for fertilizing your garden.